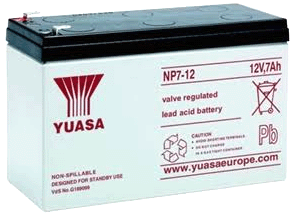
A free-energy developer working in South Africa where it is difficult to find electronic components, has very kindly shared the details of his compact self-powered generator so that you can build one if you choose to do so. Using a small inverter, the output of the prototype is 40 watts at mains voltage and frequency and the generator is a small table-top unit which is not difficult to build. The generator uses five small 12-volt 7 Amp-Hour lead-acid batteries like this:
 While this sounds like a lot of batteries, bear in mind that this is a generator which has a continuous electrical output, day and night and the batteries never have to be charged – a bit like a solar panel which works at night as well as during the day. Even if you are not familiar with electronics circuit diagrams (chapter 12 can fix that for you if you want), please try to follow along as we run through the circuit diagram and explain how the generator works. This is the circuit diagram: 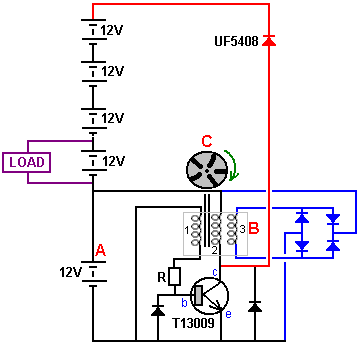 The battery marked “A” powers the circuit. A rotor “C”, containing five magnets is moved so that one of the magnets passes near the coils. The coils set “B” has three specially-wound coils and the magnet moving past those three coils generates a small current in coil number “1” which then flows through the resistor “R” and into the base of the transistor, causing it to switch on. The power flowing through the transistor coil “2” causes it to become a magnet and that pushes the rotor disc “C” on its way, keeping the rotor spinning. It also induces a current in the winding “3” and that current is rectified by the blue diodes and passed back to charge battery “A”, replacing the current drawn from that battery. When the magnet in rotor “C” passes away from the coils, the transistor switches off, moving its collector voltage very quickly up to the +12 Volt line, starving coil “2” of current. Because of the way that coils are, the coil drags the collector voltage on up and it would reach 200 volts or more if it were not connected through the red diode to all five batteries which are connected in one long chain. The batteries will have a combined voltage of just over 60 volts (which is why a powerful, fast-switching, high-voltage T13009 transistor is being used. As the collector voltage passes the voltage of the battery chain the red diode starts conducting, passing the available energy in the coil into the battery chain. That current pulse passes through all five batteries, charging all of them. The higher voltage caused by so many batteries means that higher power is fed into all the batteries from coil “2”. Loosely speaking, that is the generator design. In the prototype, the load for long-term testing was a twelve volt 150-watt inverter powering a 40-watt mains light bulb: 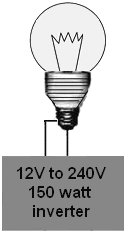 The basic design shown above was then modified by the addition of two additional pick-up coils: 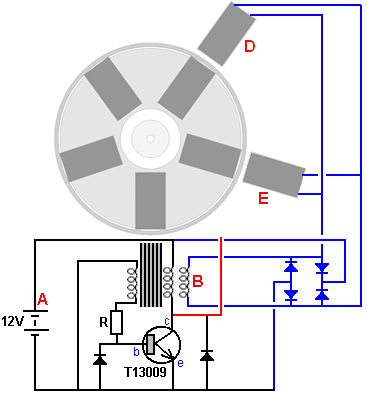 Coils “B”, “D” and “E” are all triggered at the same time by three different magnets. The electrical energy produced in all three coils is passed to the four blue diodes to produce a DC power supply which is used to charge battery “A” which powers the circuit. That additional input to the drive battery and the addition of two more drive coils to the stator, makes the system operate securely as self-powered, maintaining the voltage of battery “A” indefinitely. The only moving part of this system is the rotor which is 110 mm in diameter and is a 25 mm thick acrylic disc mounted on a bearing taken from an old computer hard disc drive. The arrangement looks like this: 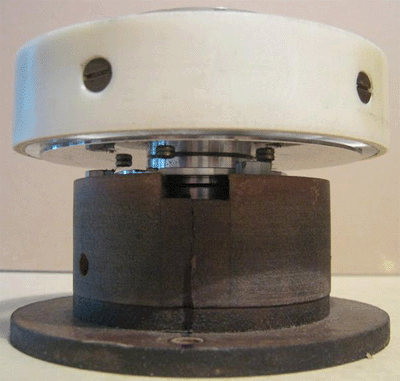  In the pictures, the disc looks to be hollow but in actual fact it is solid, very clear plastic. The disc has been drilled at five evenly spaced points around the circumference, that is, at 72 degree intervals. The five main holes drilled in the disc are to take the magnets which are sets of nine circular ferrite magnets, each 20 mm in diameter and 3 mm thick, making each stack of magnets 27 mm long and 20 mm in diameter. The magnet stacks are positioned so that their North poles face outwards. When the magnets have been installed, the rotor is placed inside a strip of plastic pipe which prevents the magnets escaping when the disc is spun rapidly. The plastic pipe is secured to the rotor using five bolts with countersunk heads. The gap between the rotor and the coils can be set as anything from 1 mm to 10 mm as the coils have slotted mounts as can be seen from this picture of an earlier version of the generator: 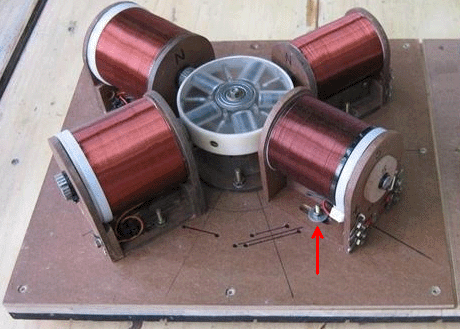 Notice the way that the coil mounts allow the distance between the coils and the rotor to be changed. The working gap between the rotor and the coils can be adjusted so that the performance can be maximised by finding the most effective gap. The spools of the coils are 80 mm long and the ends are 72 mm in diameter. The centre shaft of each coil is made of a length of plastic pipe with a 20 mm outer diameter and an inner diameter of 16 mm. giving a wall thickness of 2 mm. After being wound, that inner diameter is filled with a series of welding rods with their welding coating removed, and which are then encased in polyester resin although a solid bar of soft iron is a good alternative: 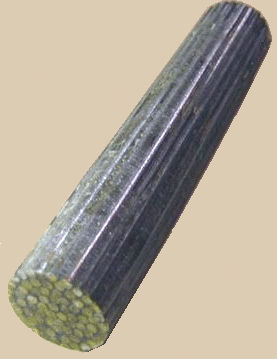 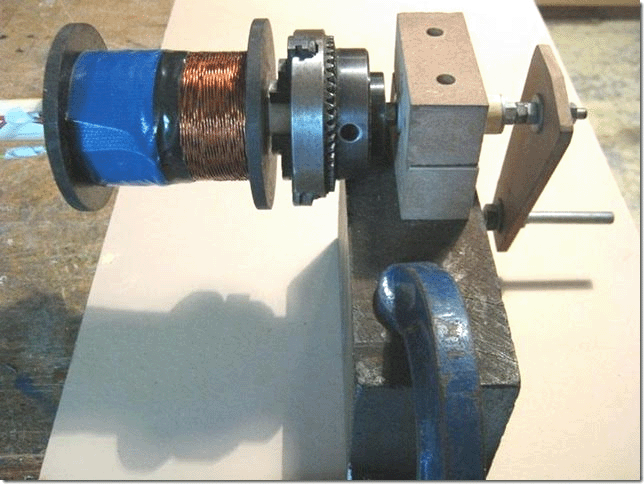 The three strands of wire which form coils “1”, “2” and “3” are 0.7 mm diameter wire and they are twisted together to become a “Litz” wire before being wound into the coil “B”. This produces a much thicker composite wire strand which is easy to wind accurately on to the spool. The winder shown above uses a chuck to grip the coil core for winding, but any simple winder will work well. The developer does the Litzing by stretching out three strands of wire, each coming from a separate 500 gram reel of wire. The three strands are clamped at each end with the wires touching each other at each end and with three metres between the clamps. Then, the wires are clamped in the middle and 80 turns applied to the middle. That gives 80 turns for each of the two 1.5 metre lengths held between the clamps. The twisted wire is wound on to a makeshift reel to keep it tidy as this twisting has to be repeated 46 more times as the entire contents of the reels of wire will be needed for this one composite coil: 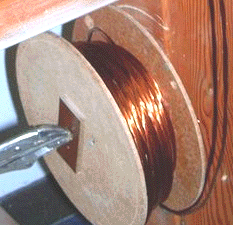 The next 3 metres of the three wires is now clamped and 80 turns applied to the central point, but this time the turns are applied in the opposite direction. Still the same 80 turns, but if the last length was ‘clockwise’ then this stretch of wire will be turned ‘counter-clockwise’. This alternation of direction gives a finished set of twisted wires where the direction of twist reverses every 1.5 metres along the length. That is the way that commercially produced Litz wire is made, but I seriously doubt that the resulting performance is any better than if the direction of wind was never changed and the twisted wire had the same direction of twist along its whole length. This very nice twisted group of wires is now used to wind the coil. A hole is drilled in one spool flange, right beside the central tube and core, and the start of the wire fed through it. The wire is then bent sharply at 90 degrees and fed around the shaft of the spool to start the winding of the coil. The wire bundle is wound carefully side by side along the length of the spool shaft and there will be 51 turns in each layer and the next layer is wound directly on top of the first layer, moving back towards the start. Make sure that the turns of this second layer sit exactly on top of the turns beneath them. This is easy to do as the wire bundle is thick enough to make positioning very easy. If you prefer, a single thickness of white paper can be placed around the first layer, to make it easier to see the second layer as it is wound. There will be 18 of these layers to complete the coil, which will then weigh 1.5 kilograms and in 2016 prices in the UK, the wire in this coil will cost £45 and the winding looks like this: 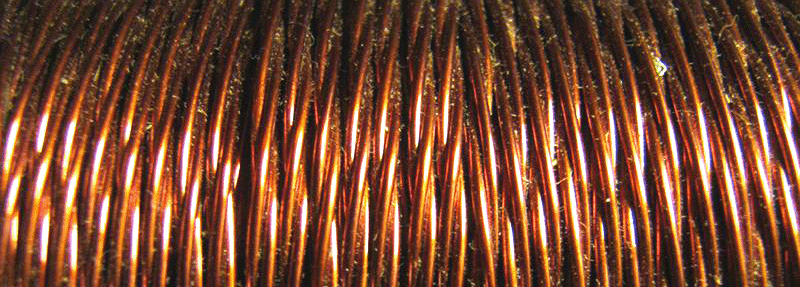 This completed coil now contains three separate coils in very close proximity to each other and that arrangement is excellent when one coil is powered up, for inducing energy in the other two coils. This winding now contains coils 1,2 and 3 of the circuit diagram. There is no need to concern yourself with marking the ends of each strand of wire as a simple ohmmeter will tell you which two ends have a winding between them. Coil 1 is used as the trigger coil which switches the transistor on at the right instant. Coil 2 is the drive coil which is powered by the transistor, and Coil 3 is the first of the output coils: 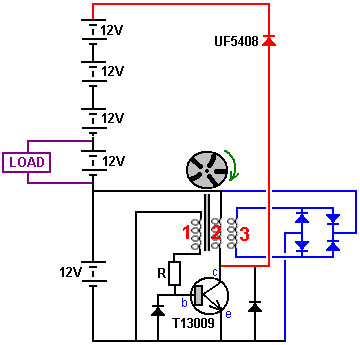 Because of the coils which were already to hand during the development of this highly successful system, coils 4 and 5 are simple helical-wound coils which are wired in parallel with drive coil 2. They boost the drive and they are necessary. Coil 4 has a DC resistance of 19 ohms and coil 5 a resistance of 13 ohms. However, investigation is underway at present to determine the best coil combination for this generator and it is probable that the additional coils will be the same as the first coil, coil “B” and that all three coils are connected in the same way and the driving winding in each coil driven by the one powerful, fast transistor. The present arrangement looks like this:  The two gantries can be ignored as they were only for investigating alternative ways of triggering the transistor and they are no longer used. At this time, coils 6 and 7 (22 ohms each) are extra output coils connected in parallel with output coil 3 which is 3 strands each with 4.2 ohm resistance. They can be air-core or have a solid iron core. Testing indicates that the air-core version works slightly better than having an iron core. These two coils are wound on 22 mm diameter spools and each has 4000 turns of 0.7 mm (AWG # 21 or swg 22) enamel or shellac insulated solid copper wire. All of the coils are wound with this size of wire. With this coil arrangement, the prototype has run continuously for three weeks, maintaining the drive battery at 12.7 volts all the time. At the end of the three weeks, the system was stopped so that it could be altered and tested with a new configuration. In the configuration shown above, the current flowing from the driving battery into the circuit is 70 milliamps, which at 12.7 volts is an input power of 0.89 watts. The output power is either 40 watts or close to it, which is a COP of 45, not counting the fact that three additional 12V batteries are being charged at the same time. That is very impressive performance for the circuit. Again, our thanks go to the developer for freely sharing this most important circuit which he developed and for his future modifications, the first of which is shown here: 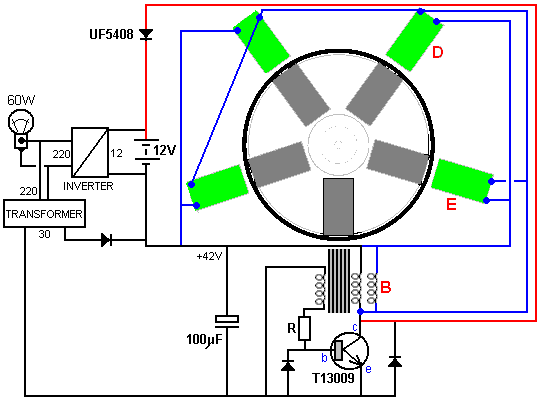 In this arrangement, coil “B” is also pulsed by the transistor and the output from the coils around the rotor is now directed to the output inverter. The drive battery has been eliminated and a low-power 30V transformer and diode run from the inverter output replaces it. Spinning the rotor generates sufficient charge on the capacitor to get the system running without a battery. The output power has now risen to 60 watts which is a 50% improvement. The three 12-volt batteries have also been eliminated, and the circuit can run with just one battery. Continuous power output from a single battery which never needs to be recharged is a very satisfactory situation. The next advance is a circuit arrangement using a Hall-effect sensor and an FET transistor. The Hall-effect sensor is aligned exactly with the magnets. That is, the sensor is positioned between one of the coils and the rotor magnet. There is a 1 mm clearance between the sensor and the rotor and the arrangement looks like this: 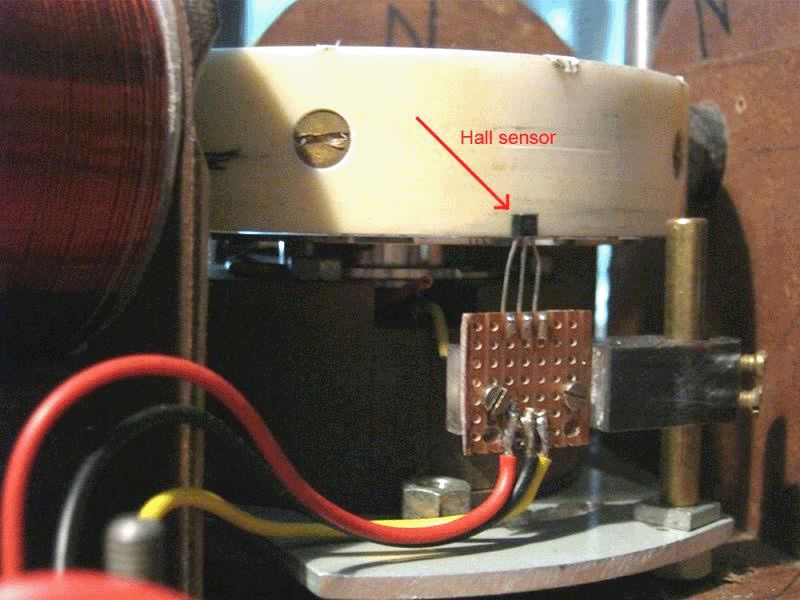 Or when the coil is in position, the view from above is like this: 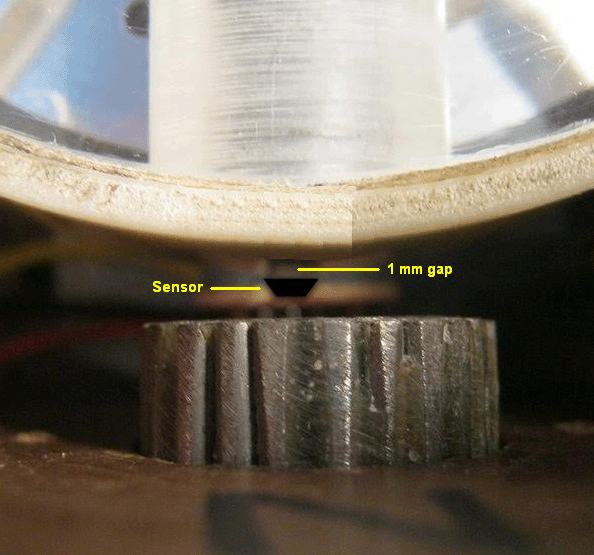 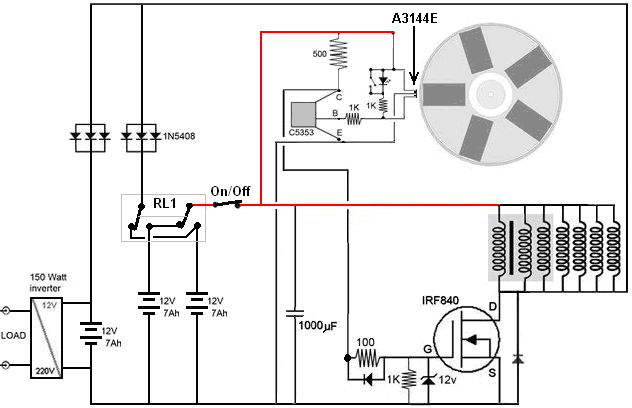 This circuit has a 150 watt continuous output and it uses three 12-volt batteries. The first two batteries are used, one to power the circuit while the second one is being recharged through three diodes wired in parallel to improve the recharging current flow. The two-pole two-way changeover switch “RL1” swaps the batteries over every few minutes using the circuit shown below. This technique keeps both batteries fully charged. The recharging current also flows through a second set of three diodes wired in parallel, recharging the third 12-volt battery which powers the inverter which supplies the load. The test load was a 100-watt bulb and a 50-watt fan. The Hall-effect sensor drives a C5353 transistor but any fast-switching transistor such as a BC109 or a 2N2222 transistor can be used. You will notice that all of the coils are now being driven by the IRF840 FET. The relay used for the switching is a latching type such as this one:  And it is driven by a low current draw ILC555N timer like this: 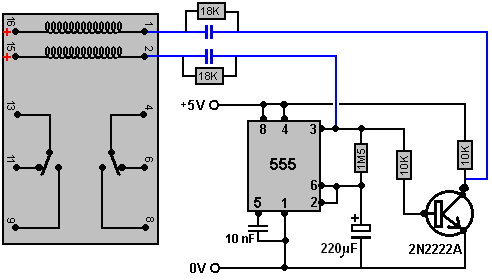 The capacitors shown in blue are chosen to operate the actual physical relay which is used in the circuit. They give the relay a brief switching pulse every five minutes or so. The 18K resistors across the capacitors are to bleed off the capacitor charge during the five minutes when the timer is in it alternative state. However, if you wish to avoid switching between batteries, the the circuit can be arranged this way: 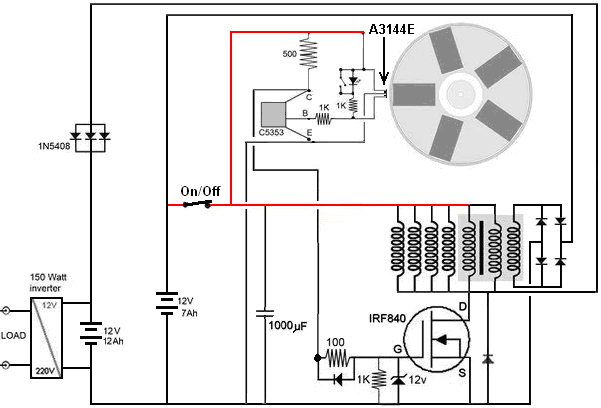 Here, the battery which powers the inverter which supplies the load is increased in capacity and while the developer used two of his 7 Amp-Hour batteries, you can use a standard 12-volt 12 Amp-Hour battery intended for a mobility scooter. All but one of the coils is used to supply current to the output battery and the one remaining coil, which is part of the three-strand main coil, is used to supply the drive battery directly. The 1N5408 diode is a 100-volt 3-amp component. The diodes which are not shown with a type number against them can be any diode in the 1Nxxx range of diodes. The coils shown connected to the IRF840 FET transistor are physically positioned around the circumference of the rotor. There are five of these coils as the grey shading indicates that the righthandmost three coils are the separate strands of the main 3-wire composite coil which was shown in the earlier circuits Update in April 2018: While the three-strand twisted wire coil prepared for the Bedini-style switching was used for both drive and output purposes, it was actually no longer necessary to use a coil of that type and an ordinary helically wound coil containing 1500 grams of 0.71 mm diameter enamelled copper wire would have been just as effective. Development has been continuing and the following circuit has been found to work very well: 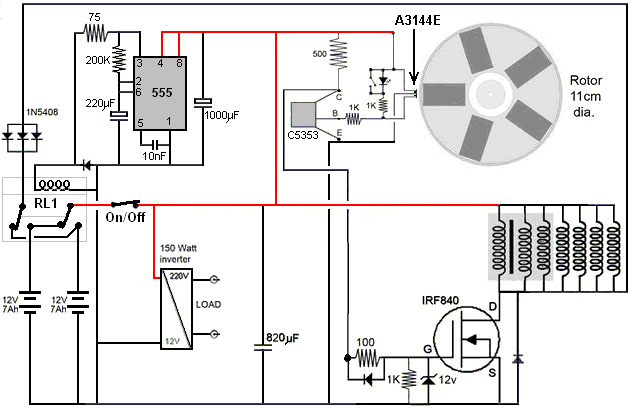 In this version of the circuit, a 12-volt non-latching relay is used. The relay normally draws 100 milliamps at 12 volts but a 75 ohm or a 100 ohm resistor in series lowers that current to about 60 milliamps. That current is only drawn for half the time as the relay is not powered up when the “normally closed” contacts are being used. The system powers itself very satisfactorily as before. However, the South African developer would very much like to omit the mains inverter, and so he prefers the following arrangement. This version powers the drive circuitry through an ordinary DC-to-DC inverterer which provides additional voltage to the IRF840 transistor and the circuit works very well with this configuration: 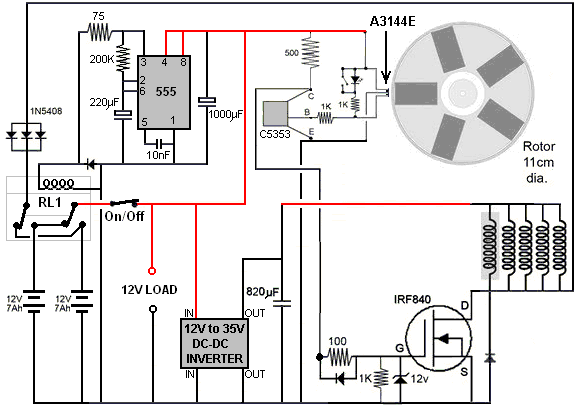 The developer stresses that the circuit operates in a non-intuitive way. First, the performance is somewhat reduced if the rotor spins faster which is something which is not at all obvious. Then it has been found that using ferrite magnets produces a better performance than using the stronger neodymium magnets. He sees it as the coil pulses being a mechanism for preventing ‘cogging’ or backward drag on the passing rotor magnets. This is the same thing that Robert Adams found with his high performance motor/generator. In Robert’s design, the rotor was drawn to the iron cores of his coils, making his motor essentially a permanent magnet motor. Admittedly, Robert’s rotor got additional thrusts from the current in his output coils being switched off at exactly the correct instant, but that involved a somewhat higher level of design complexity. While there is no official claim that this South African design is actually a permanent magnet motor/generator, it is difficult not to see some of its performance coming directly from the magnets themselves. Finally, the design which the designer likes best of all is this one which has no inverter or converter and which can power any ordinary 12-volt load: 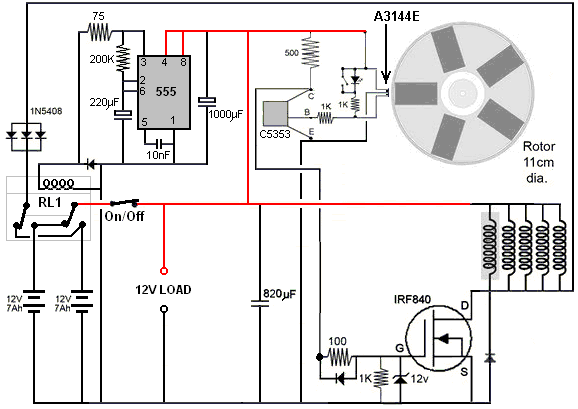 The output (marked as “12V Load”) is effectively a 12-volt battery which never needs recharging and which can power any typical 12-volt small piece of equipment such as lighting, a fan, a computer or whatever. You will notice that the triple coil is now shown as a single helically wound coil with a shaded background as there is no longer any need for a triple wound coil as the Bedini-style switching is no longer used. Let me stress that the five coils driven by the IRF840 FET transistor are shown in a horizontal row just for clarity. In reality, they are spaced out evenly around the rotor, that is, at 72-degree spacings around the rotor. There is nothing special about having five magnets in the rotor and that number could be six, eight, ten or twelve magnets if there is room for the corresponding coils around the rotor. At the present time (April 2018), this is where the developer has reached and he considers the circuit shown above to be very satisfactory for his needs. So, let me (Patrick Kelly) make some untested suggestions which are intended to be helpful for replicators of the design. The rotor spins fast at about 2500 rpm (varying from 2000 to 3000 rpm depending on load and supply voltage). That is about 42 revolutions per second. As there are five magnets in the rotor, that produces about 208 pulses per second. It is essential that the rotor itself is made very accurately so that there is no imbalance and so no vibration forces are generated by the rotation. The developer used a lathe to produce a perfect rotor but that option is not generally available to most people. I suggested casting a rotor using epoxy resin but it was pointed out that you have to have an exactly horizontal surface for that or the rotor will have an uneven thickness which would be disastrous. If you have access to a large 3D printer, a good rotor could be built up. One replicator shows his rotor like this: 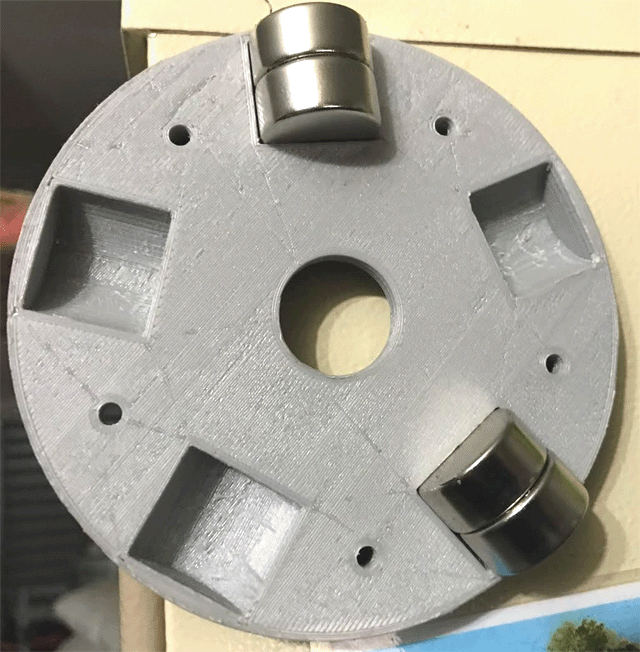 This 3D-printed rotor is made in two halves which are then bolted together. The developer has continued advancing his design. One of the things which he didn’t like was the fact that the five coils being used required a total of some 1640 metres of wire, so smaller coils were constructed. This new arrangement works spectacularly well and each new coil has a total wire length of just 22 metres, which is less than one twelfth of the previous wire length. The wire size remains 0.711 mm diameter wire (swg 22 or AWG #21) and each new coil is wound on a 6 mm diameter iron bolt core and the windings cover a length of 24 mm along the bolt which has two 30 mm diameter flanges mounted on it giving an overall length of 30 mm and the completed winding is 27 mm in diameter. There are twelve layers of the 0.71 mm diameter wire on each coil. These new coils are connected in two groups of five in series, giving a DC resistance of about 4 ohms for each chain of five coils. The voltage spikes generated when a set of five coils is switched off is more than 500 volts. The wire in each coil weighs 70 grams. The coils look like this: 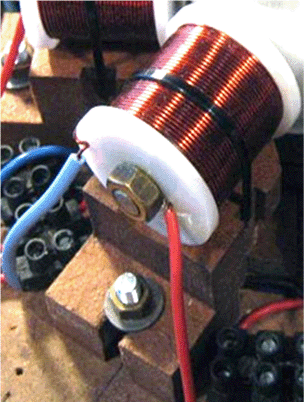 And they are drawn like this: 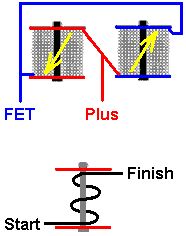 The two sets of five coils in series are connected in opposite directions as shown above. The Start of the set of coils shown in blue and the Finish of the set of coils shown in red are connected to the Plus of the battery. This causes current to flow in opposite directions in each set of five coils and if one set has a North pole facing the rotor, then the other set will have a South pole facing the rotor. The coils are alternated around the rotor like this: 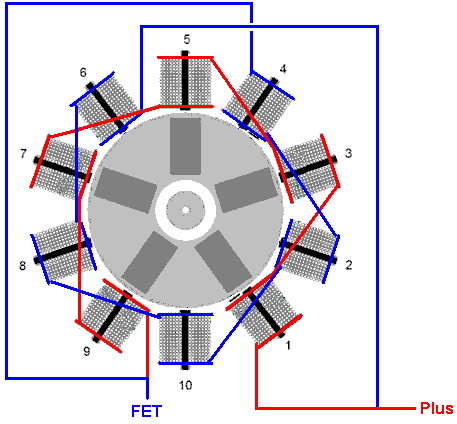 All ten coils are pulsed at the same instant and that instant is arranged to happen when a rotor magnet is between the two opposing coils. One coil pushes the magnet away and the other coil pulls that same magnet towards itself. This is very effective with the rotor spinning so fast that the developer describes it as being “scary” and he has to clamp it to the workbench because of the power being generated. Another reason why there is such a great increase in power is that now the design uses two Hall-effect sensors (at coil 1 and coil 4 in the above diagram) and that gives ten pulses per rotation as opposed to the earlier five pulses per rotation. The drive circuit is very simple indeed. The developer now uses a different method of mounting the ten coils so that there is more space to access the Hall-effect sensors for adjustment. The whole top wood and acrylic mounting ring is easily removed by loosening just four screws: 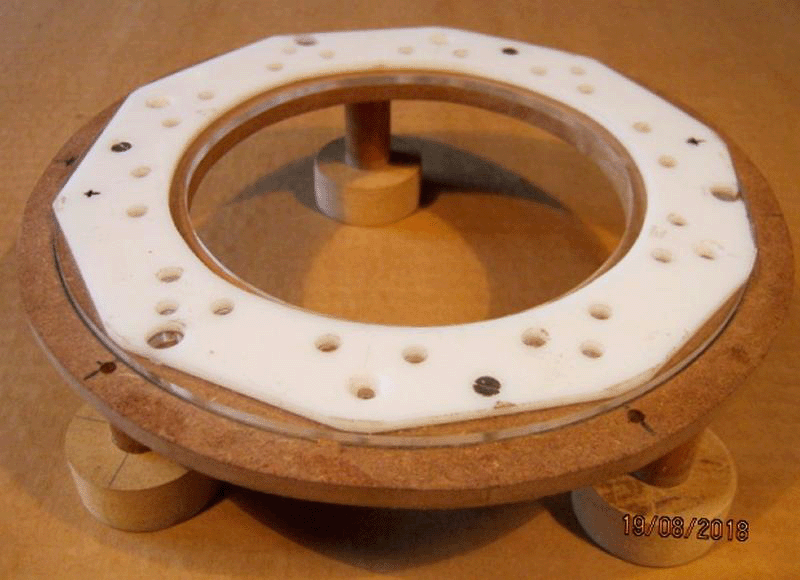 The small coils are held in place with cable ties and are easy to remove. Each coil has a resistance of 0.8 ohms and the cores are standard 6 mm diameter galvanised iron bolts which do not retain magnetism, that is, they do not become permanent magnets no matter how often they are stroked repeatedly with a strong permanent magnet. The set of ten coils mounted around the rotor look like this: 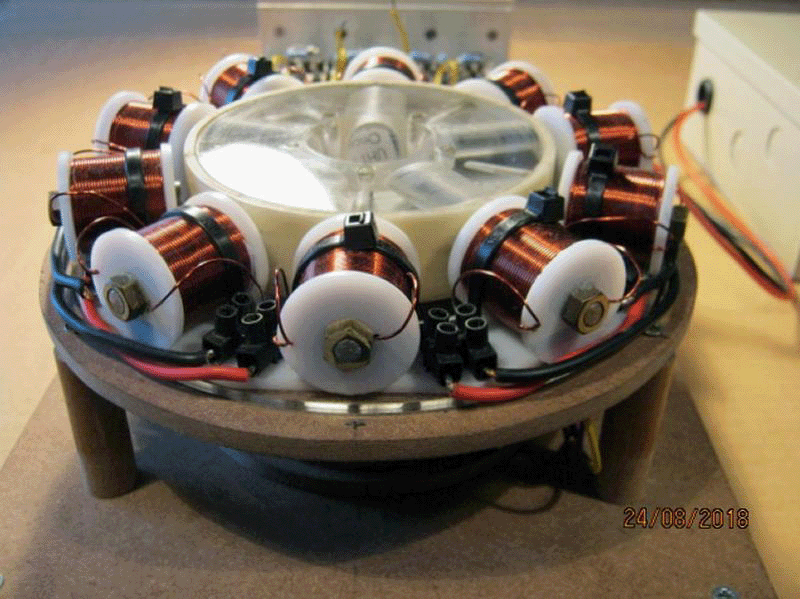 Remember that the coils are mounted on their own support ring and so can be handled as a single unit. This is very convenient. In the following picture, the matchbox at the right had side of the picture is there to give you a good visual idea of the size of the unit: 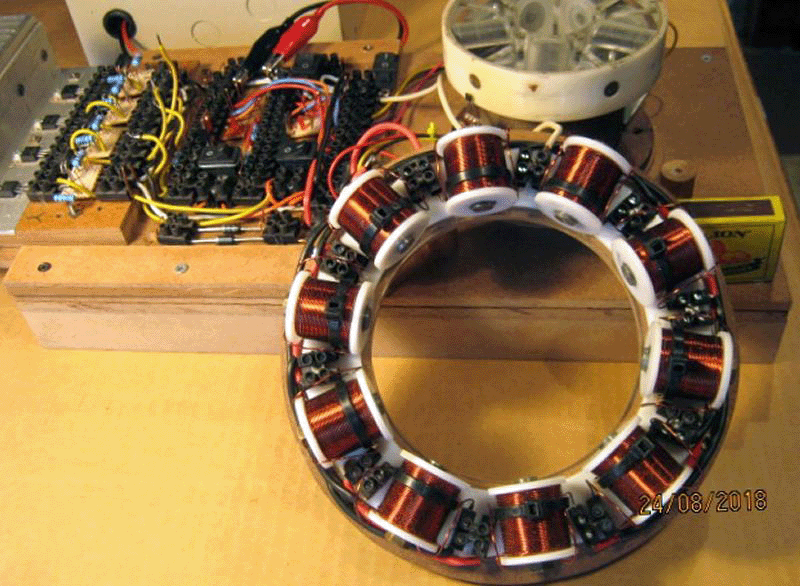 The working space left free around the underside of the rotor is much greater than was available in the earlier designs: 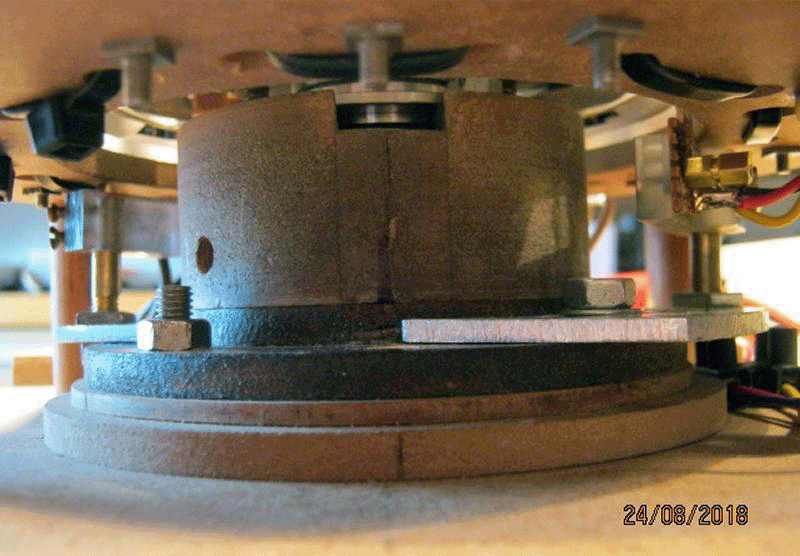 It is important to understand that while the 110 mm diameter rotor has five magnets located at even intervals around it’s circumference, there are now ten coils on the surrounding stator, and there are now ten pulses per revolution. These pulses are powerful and when the current is cut off, each chain of five coils generates 600 volt spikes (although that can reach 900 volts on occasions). In this latest design, every second coil is wired in reverse so that it presents a South pole to the rotor magnet, and there are now two Hall-effect sensors, one just before the rotor magnet and one just after the rotor magnet. This allows a simplified circuit with just one drive transistor like this: 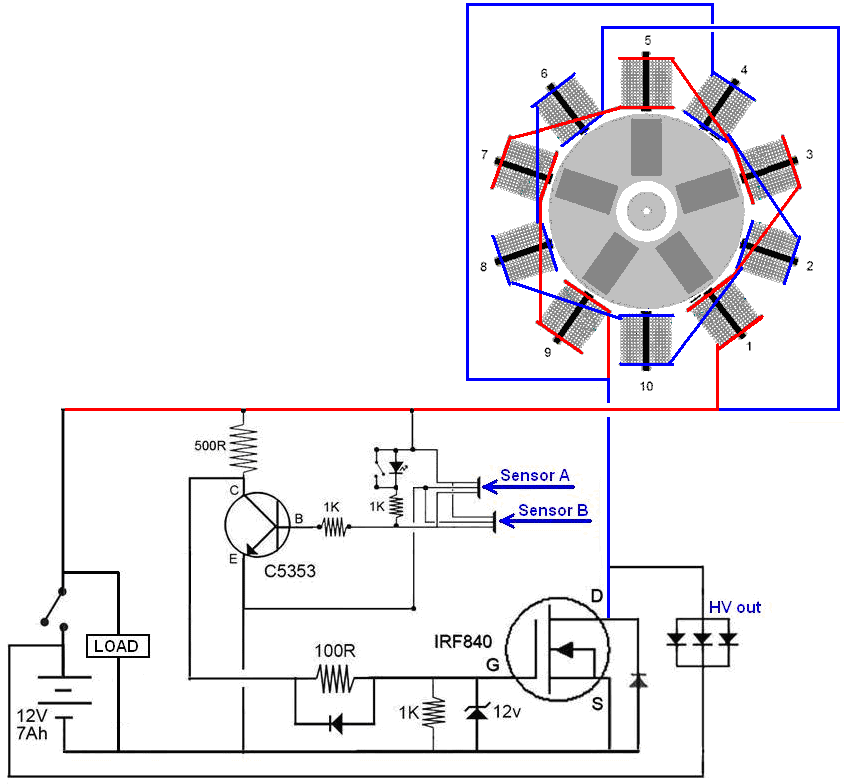 However, while this circuit works very well, the designer prefers the following circuit, and wile it has a larger number of components, it has the advantage of having two separate outputs: 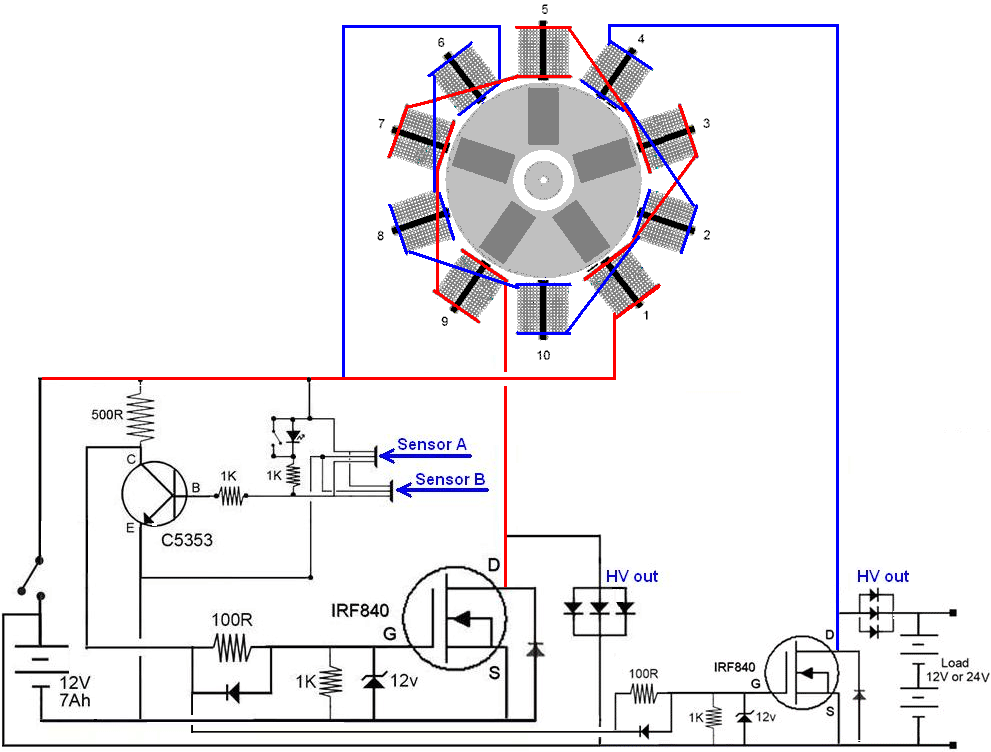 As it stands, this circuit can charge 12V or 24V batteries or power a 12V inverter connected across a 12V battery, or 24V inverter connected across a 24V battery. A version of this circuit with fewer components which works very well indeed is this: 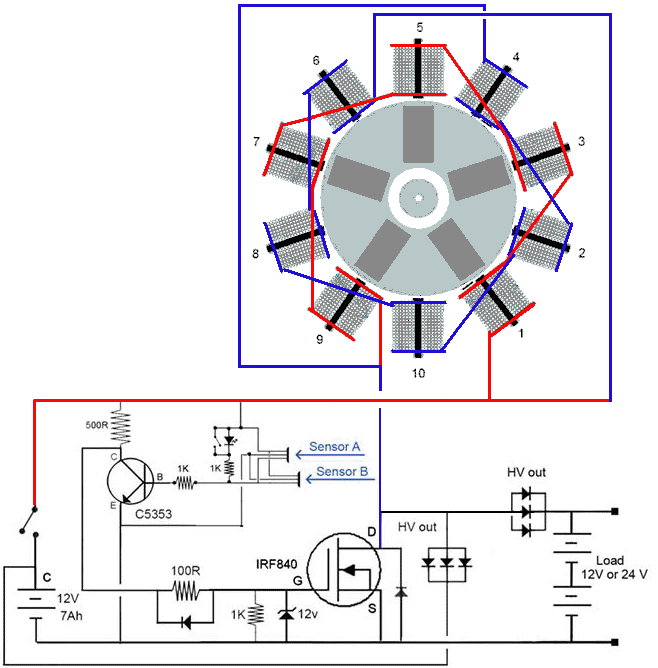 The initial designs are fine for people with good constructional skills and access to suitable equipment. However, it has always been desirable to have a motionless, solid-state version which generates excess power without moving parts or the constructor needing to have good skills and equipment. This next step comes by applying common sense to the earlier designs which have proved to have very satisfactory operation and output. If the latest rotor version produces ten pulses per revolution and rotates at say, 2500 revolutions per minute, then the circuit generates about 2500 x 10 / 60 = 417 pulses per second. That is normally written as 417 Hz which is a low rate for an electronic circuit although it is a major rate of mechanical rotation The circuit generates it’s excess power by applying these 417 pulses per second of 12-volts to two chains of five small coils in each chain. If we want to reproduce this performance without the rotor and it’s magnets, then we need to apply 12-volt pulses to those two chains of coils 417 times every second. That may sound difficult if you are not familiar with electronics, but in actual fact, it is a very simple task and 417 Hz is very slow operation for an electronic circuit as they could easily generate 3,000,000 pulses per second. Because we live in an intense energy field, when each of those 12-volt pulses is cut off, the voltage across the coil chain rises very rapidly to more than 600-volts and that causes an inflow of energy into the circuit from our local environment. That inflow of energy is much greater than the original 12-volt pulse, and that is what we call “free energy”. The latest coils used with the rotor system are wound twelve layers deep and 27 mm long, on galvanised iron 6 mm diameter bolts. There is a common conception that iron can’t change it’s direction of magnetism very fast. Personally, I’m not at all sure that that is actually correct, but initially, let us presume that we need to keep the pulsing down to say, 800 Hz or less. Of course, if we are winding coils for this solid state project, then we could wind them on a ferrite rod as the core as that should allow a much higher pulsing rate, and it is reasonable to presume that the greater the number of pulses per second, the greater the average excess output power will be. Initial tests have been carried out using the existing ten coils which were used with the rotor circuit. The output proved to be satisfactory and pretty much equivalent to the rotor circuit output if the driving signal was 40% On and 60% Off: Just initially, we will stay with low frequency (due to assumed iron core coil limitations) and run the testing using a circuit of this type:  The resistor “R” and the capacitor “C” control the frequency of the pulsing and the result is very good. However, as the developer has powered both coil chains of his rotor circuit from a single transistor (although they generate at least 600V feedback pulses), he used just one transistor for his tests. He also likes to use his circuit which swaps over two drive batteries, one to provide current while the other one is recharging, but that is a minor matter. So, let’s say for argument sake, that the above circuit is running at about 500 Hz (C and R might be 100nF and 1.5K) in order to keep the coil frequency down, then there will be some 500 pulses per second returned to the drive battery. But, if we were to connect the circuit like this: 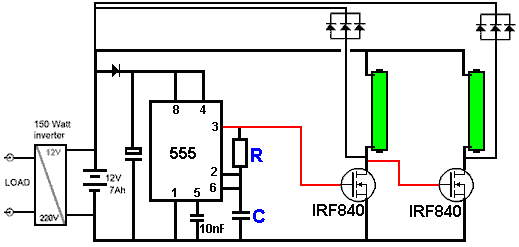 Then when the first transistor switches on, the second transistor switches off and vice versa. Doing that returns twice as many pulses per second to the drive battery without increasing the rate of pulsing of either of the coil chains. Remember also, that the transistors are powerful enough to drive several coil chains simultaneously, and each extra coil can be expected to increase the excess output power available. However, testing shows that the output from the first transistor is not very good for switching the second transistor and so a better result is produced with the addition of a monostable circuit as that allows you to specify exactly what length of voltage pulse you want for the second transistor:  This technique of keeping the coils pulsed slowly while increasing the rate of pulses passed back to the output, can be extended further. It is perfectly possible to cascade ten or more coil chains during each of the 500 Hz pulses. That raises the output pulse rate without raising the coil pulse rate. This can be done by using a Divide-By-Ten chip, such as the CD4017B which can be wired to act as divide-by-9, divide-by-8, etc. down to divide-by-2. This is achieved by connecting the Reset pin (pin 15) to the next output. In the following circuit diagram, a divide-by-3 arrangement is shown and the divide-by-4 output is connected to the reset as that bounces the output back to output 1 again. The 555 clock is speeded up by a factor of three as it will take three times as long before the high voltage output of the 4017 chip returns to output 1 (on pin 3). The chip connections are like this: 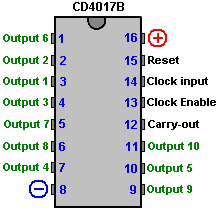 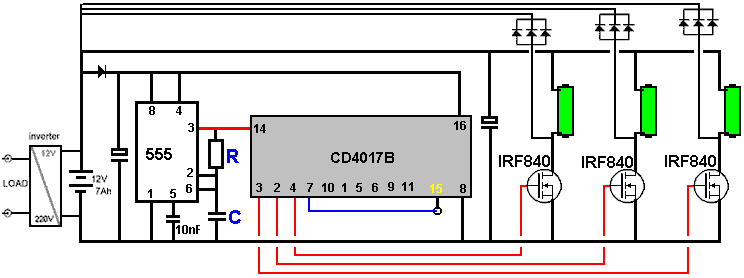 For a divide-by-4 output, pin 10 would be connected to Reset pin 15 and the fourth output would be from pin 7 and the 555 clock pulse rate increased to four times the original rate by lowering the value of “C” or increasing the value of “R”. Please remember that the transistor needs to be able to handle high voltages if you decide to use a different type, also, you will need a more powerful DC/AC inverter to handle higher output power. There is essentially no limit to the output power you can achieve with solid state as you just add more coils and possibly more transistors. Please use a heat sink with each transistor. 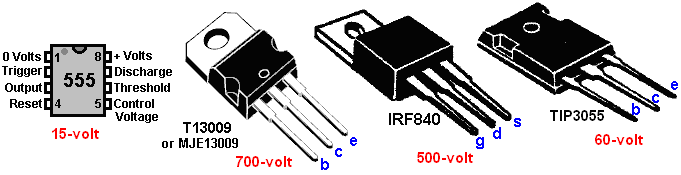 If you decide to use a 24-volt input, please remember that both the 555 chip and the 4017 chip need to be kept down to 12-volts as they are not able to handle 24-volts. Also, you need a 24-volt inverter if you decide to do that. If experimentation shows that your particular construction of the circuit works better at higher and higher frequency of clock pulses, and that results in each coil driving transistor needing a longer drive voltage period than the length of one divide-by-N clock period, then that can be dealt with by using a monostable on each output as shown by the shaded portions of this diagram: 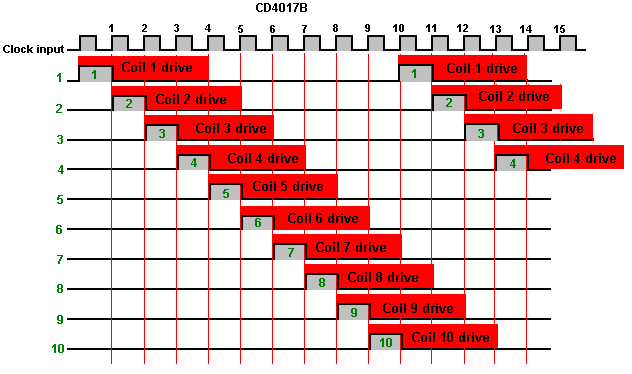 Now that there is no need to construct a precision rotor with magnets, the only significant task is to wind the coils which generate the excess power. It is perfectly possible to wind perfect coils without any equipment at all. First, you need to choose the wire diameter and buy in the wire needed. Wire of 0.71 mm diameter is popular (swg 22 or AWG 21) and is easy to work with. Then you need to choose the core material – iron (not steel) or ferrite and create a spool with that core by attaching stiff flange discs of about 30 mm diameter at the ends of the core for iron. The coils shown here are wound on 8 mm iron bolts with windings 75 mm long, eight layers of wire and 40 mm diameter flanges (which could be much smaller): 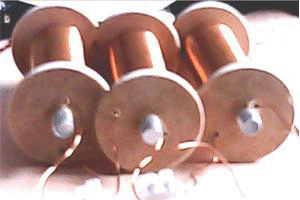 Three of these coils can be wound from a single 500 gram reel of 0.71 mm wire and the iron cores can certainly operate at more than 6000 Hz. Each of these coils has about 315 turns and a DC resistance of 1.6 ohms. However, ferrite is generally considered to be a better core for high frequency operation and these can be wound quite easily Using the same 0.71 mm diameter wire (swg 22 or AWG #21), a 140 mm long ferrite rod of 10 mm diameter can be wound quite easily without any equipment, and six coils with three layers each can be wound from a single 500 gram reel of wire, and each coil has about 590 turns and a DC resistance of one ohm. The basic ferrite rod has a 20 mm diameter disc of stiff cardboard glued to each end. It looks like this: 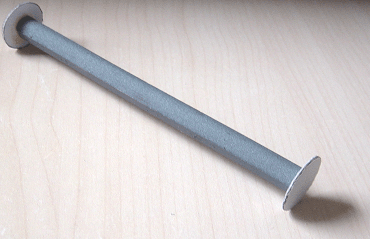 Cut a 140 mm wide piece of paper 32 mm long. This width matches the gap between the spool flanges. Attach a strip of Selotape to the paper so that it overlaps by half its width all along the paper strip and set it aside until the first layer of wire has been wound. You can hang the full spool of wire on a rod hung from the edge of a table or desk. Push the first few inches of wire through a hole through the flange near the core and start winding by turning the spool in your hand. The winding needs to be done carefully so that the turns lie cleanly side by side with no gaps between them and no turns overlapping any other turn: 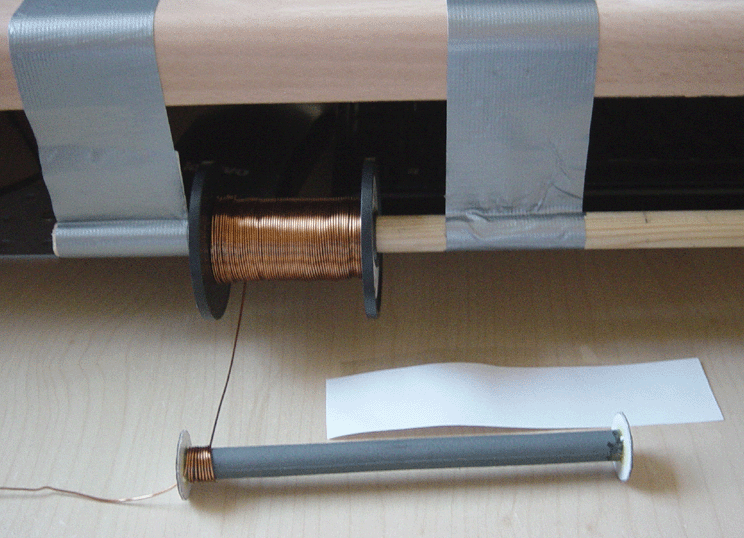 When the far end of the spool is reached, stick the piece of paper to the layer of turns using the Selotape already on the paper, bend the paper round the layer of winds and pull it tight using other strips of Selotape to hold it in place as you move progressively along the length of the spool. The paper will not be long enough to go all the way around the layer as the core now has the wire thickness making the core larger, but that is quite intentional as you don’t want more than a single layer of paper. You will need the paper layer to allow you to see the next layer of wire clearly as you wind it. If you don’t have that paper layer it is enormously difficult to see the next layer well enough to detect winding errors as the wire is exactly the same colour as the first layer. 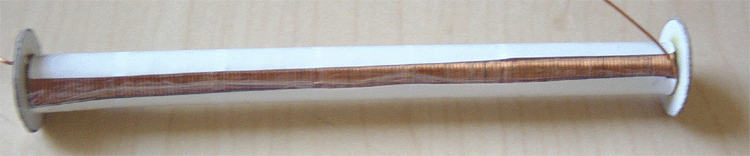 You now have a perfectly wound first layer. Before starting the second layer, cut the next strip of paper, measuring 40 mm wide. Stick a strip of Selotape along the length of the paper, again, with half of the width of the Selotape overlapping the paper and set it aside. Wind the next layer in exactly the same way, finishing by sticking and securing the paper around the core with its two layers of wire. 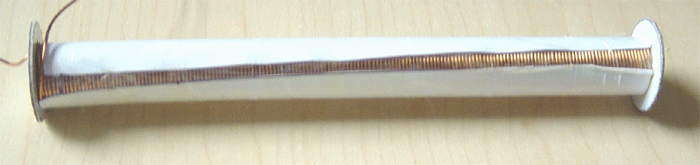 That process is repeated until all of the desired layers have been wound. Finally, the wire is cut with a few inches left for connecting the coil in the circuit, and the wire is passed through a second hole in one of the flanges:  This generator can be built in thousands of variations, the main difference being the coils being used – the core material, the core length, the wire diameter, and the number of layers wound. You can, of course, start with one coil and see how your circuit performs, and later on, add one or more coils to boost the performance. The way that coils perform is not at all obvious. It is generally agreed that the larger the number of turns, the greater the voltage produced when the coil is pulsed. BUT, other factors are also important. The impedance of the coil (it’s AC resistance) makes a very big difference when the coil is being pulsed. That is affected by the core material, the wire diameter, the wire material, the number of turns, the quality of the winding, how spread out the turns are, the number of layers, etc. Generally speaking, it is probably best to wind a series of coils and test them to see which works best for you, and then wind the remaining coils to match your best result. If you wish to use two separate drive batteries, one to power the circuit while the other is recharging, then that is perfectly possible. Batteries which are providing power to a load don’t charge nearly as well as unloaded batteries being charged. However, the mechanism which switches between the two sets of batteries needs to have extremely low current draw in order not to waste current as shown earlier on. The switched power by the tiny relay can be boosted like this: 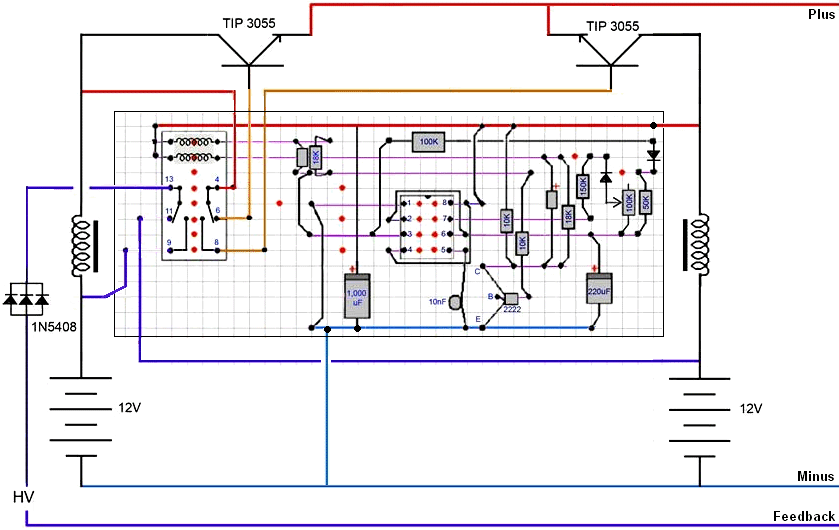 Let’s decide to build a very simple version of the circuit but allowing for later expansion for greater output power. Let’s try this circuit arrangement: 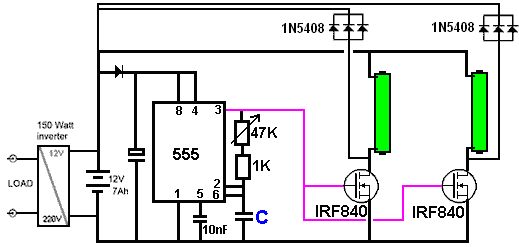 This arrangement allows for considerable alteration of the operating frequency by merely turning a knob. Experienced constructors will have their own preferred methods of construction, but we might choose to use a layout on an open board in order to make it easy to see what is happening and to give good cooling during the development stage, perhaps something like this:  This arrangement keeps soldering to a minimum and allows for easy alterations as the circuit is extended for higher output power. The timer board can be swapped out later on if you decide to use a Divide-by-N style of operation. Two types of screw connectors are used. One type has all of the connectors connected so that many wires can be connected to a single point. They look like this:  Unfortunately, these connectors cost about £5 each which is several times more expensive than the standard connector which has each connector insulated from all of the other connectors in the block: 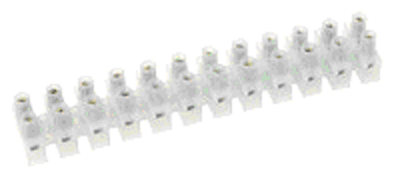 If cost is a major factor, then a standard connector strip can be converted to a single multiple output strip by wiring one side with a thick piece of wire like this: 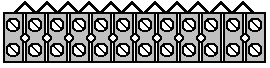 We have a problem with connecting the FET transistors because their pins are so close together that they don’t fit conveniently into a screw connector block. We can get around that problem by cutting one connector off the block, bending the central pin of the FET upwards into a vertical position and using the single cut off connector to make the connection to the central pin of the FET: 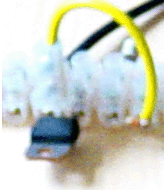 The layout of the timer is not at all critical and a layout like this might be used: 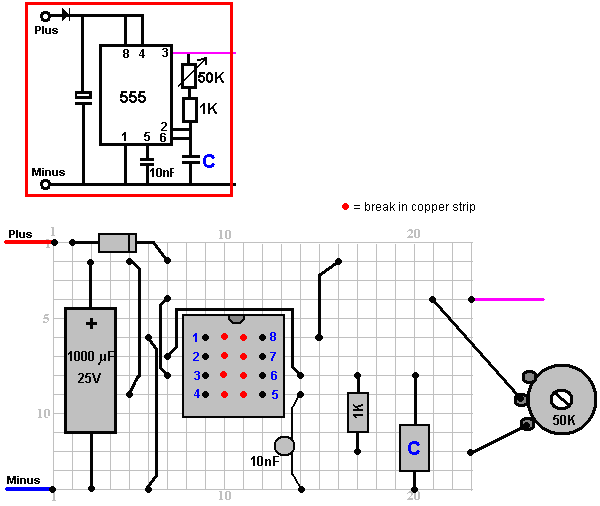 The capacitor “C” will be about 10 nF and the variable resistor can be 47K or 50K linear or a higher value could be used. So, if you were going to build this generator, how might you go about it? Well, you might start by building the timer board shown here, either as shown or to your own layout. I strongly recommend using a socket for the 555 timer chip as transistors, Integrated Circuits and diodes can easily be damaged by heat if they are not soldered quickly. As the generator is for your own use, you can avoid the horrible lead-free solder which is so difficult to work with and I suggest that 0.8 mm diameter multicore solder is the right size for this work. So, to construct the timer board you will need: 1. A soldering iron of about 40 watts, and 0.8 mm cored solder. 2. Stripboard (“Veroboard”) with 14 strips each with 23 holes. 3. A drill bit or a knife to break the copper strips which run between the pins of the 555 chip. 4. One 8-pin Dual-In-Line socket for the 555 chip. 5. Some solid-core plastic covered wire to form the jumpers on the board. 6. The components: One 555 chip, one 8-pin socket, one 1000 microfarad 25V capacitor, two 10 nanofarad ceramic capacitors, one 1K resistor, one 50K or 47K or higher linear variable resistor, one diode which could be 1N4007, or 1N4148, or almost any other diode. 7. A magnifying glass of some description. A cheap plastic one can be quite sufficient. This helps greatly when examining the underside of the board to make sure that solder joints are well made and that there is no solder bridging between adjacent copper strips. 8. A cheap digital multimeter for measuring voltages and resistance. Not essential but very, very convenient is one of those angled arm clamping devices which are usually supplied with a magnifying glass. If you discard the magnifying glass, the angled arms can hold the board and component in place, leaving both hands free to do the soldering. A cloth wet with cold water is very good for cooling down soldered joints rapidly to prevent heat damage. 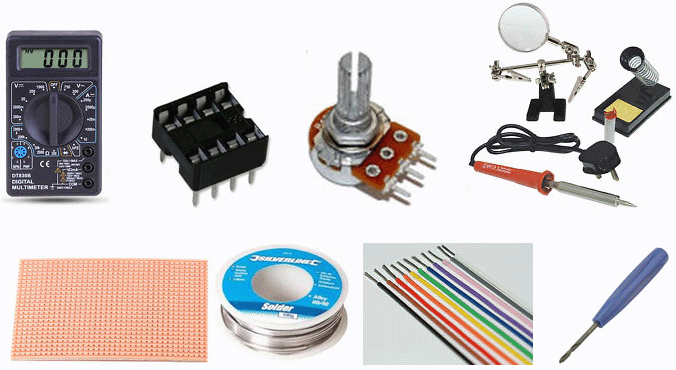 Start by breaking the copper strip in columns 10 and 11 on rows 6 to 9. This is needed in order to prevent the strips short-circuiting the pins of the 555 chip. Mount and solder the 555 socket in place (if you bend the legs outwards along their strips it holds the socket in place and makes for a good solder joint. Then, cut solid core insulated copper wire to the correct lengths and solder the five wire jumpers on the board 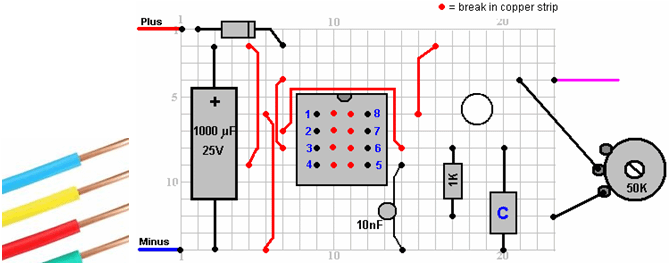 Then work from left to right, mounting the remaining components. The capacitor “C” has got a lot of spare space around it so that it can be altered at a later date if you decide that you should. Finally, connect the variable resistor (which many people mistakenly call a “pot”) and the positive and negative connecting wires using multi-strand copper wire as that is much more flexible, and lastly, the connecting wire from pin 3 out to the distribution block which connects to the FET gates. Check that the circuit has been connected correctly and that there are no soldering errors on the underside of the board – this is much easier with a magnifying glass as the gaps are very small. Set the variable resistor shaft to about its mid position, connect the board to a 12-volt source of power and measure the voltage coming from pin 3 of the 555 chip. The voltage should be about half of the supply voltage and should not change much when you adjust the variable resistor. We are now ready to start assembling the generator, getting a suitable board and attaching to it the inverter and the battery:  These two units can be attached to the base board by drilling holes through the board and using string or wire to bind them securely in place. The timer board can be attached to the base board using a screw or a bolt. The board is very light and robust and a single screw is quite sufficient to hold it neatly in place. The variable resistor and the three connecting strips can be glued to the board. Some constructors hate the idea but my preferred method is to use Impact Evostick as the glue as it is very effective and after a day or so becomes very strong indeed.  The diodes used are 1N5408 types and although each one can handle 3 amps of current, they are grouped in sets of three as that lowers the very slight resistance to current flow through them as well as raising the possible current to nine amps. My inclination is to use a separate FET with each coil, but the South African developer states that he can detect no difference between driving two coils with one FET and driving those same two coils with two separate FETs. Please understand that this presentation is for information purposes only and it is not an encouragement for you or anyone else to actually build one. Also, no representations are made that this design will produce any particular level of output power. Patrick Kelly http://www.free-energy-info.tuks.nl http://www.free-energy-info.com http://www.free-energy-info.co.uk http://www.free-energy-devices.com engpjk (at) gmail (dot) com Video |