|
There is nothing magic about free-energy and by “free-energy” I mean something which produces output energy without the need for using a fuel which you have to buy. Let me make it very clear – this is just a suggested development project. I have never seen a generator of this type in operation. The design is based on the idea that feeding high voltage to an ordinary 3-phase DC motor produces a great increase in torque (turning power) of the motor. This is confirmed by a developer who tried it some years ago and found that doing this did not harm the coils of wire inside the motor but so much torque was produced that it broke the output shaft of the motor. Generally speaking, the system suggested here is to feed about 400 volts to a 12 volt 3-phase motor. The increased torque of the motor is used to spin an ordinary alternator to generate normal mains equivalent voltage and frequency. Finally, some of the output of the alternator is fed back to provide the input power of the system. If a battery is used to start the system, then that battery is recharged by the feedback even though battery power is only used very briefly at start-up. The overall arrangement is like this: 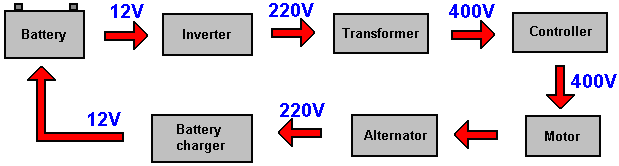 The most important components of this system are the controller and the motor. You are probably familiar with the most common type of motor which is a single-phase motor, but the more powerful motors used in industry are three-phase motors. There are several varieties of three-phase motors, but the type which we want is a “BLDC” or “Brushless Direct Current” motor. These motors are available with or without built in sensors to indicate the position of the motor as it spins. We want to use any sensorless 3-phase motor and those are the cheapest type of 3-phase motor. The website here published a program which allows an Arduino Uno R3 board to act as a controller for a brushless, sensorless 3-phase motor. That design is on their website simple-circuits and it appears to be a very successful design of theirs and it has been offered free since January 2018. It is not necessary for you to become an expert programmer of an Arduino board as the program used is provided for you. A good instruction video on how to program an Arduino Uno board is shown here. Ideally, we would like the generator to be able to power any of our household items of equipment, that is, washing machine, tumble dryer, vacuum cleaner, fridge, electric fire, air conditioning unit, fan or whatever. To do that, we would like a generator with three kilowatts of electrical output and that suggests a reasonably large motor. A three-phase motor sounds very technical, but it really isn’t. It is just a motor which has three sets of drive coils instead of just one drive coil. One 3-phase motor which appeals to developers is the Samsung washing machine motor as it has 36 coils connected as three sets, each set having twelve windings connected together. Coils set 1 has coils 1, 4, 7, 10, 13, 16, 19, 22, 25, 28, 31 and 34. Coils set 2 has coils 2, 5, 8, 11, 14, 17, 20, 23, 26, 29, 32 and 35. Coils set 3 has coils 3, 6, 9, 12, 15, 18, 21, 24, 27, 30, 33 and 36. The motor looks like this: 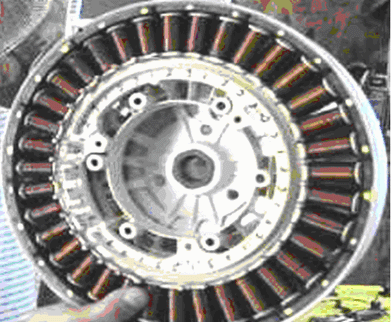 The coils remain stationary as they form the stator of the motor. There is a continuous ring of magnets immediately outside the coils. They are attached to the metal dish-shaped end housing which spins around, being the rotor of the motor. So, the motor has effectively just three coils in it and it is made to go round by pulsing the coils in order, that is coil 1, then coil 2, then coil 3, then coil 1 again and so on. The more rapidly the coils are pulsed, the faster the motor rotates, and in this system that rotation can be very fast indeed. The suggested motor is available as a replacement part for a washing machine and can be bought quite readily: 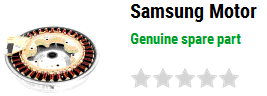 However, two bearings and a drive shaft need to be constructed in order to convert the Samsung motor into a device which can drive an alternator: 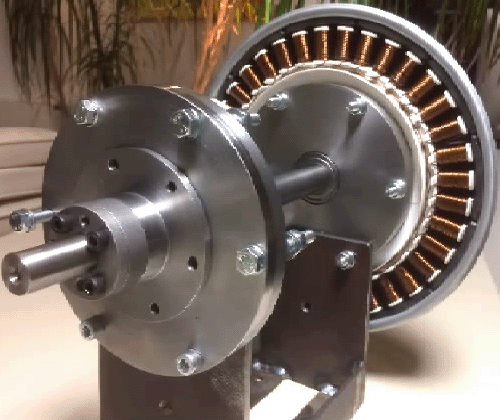 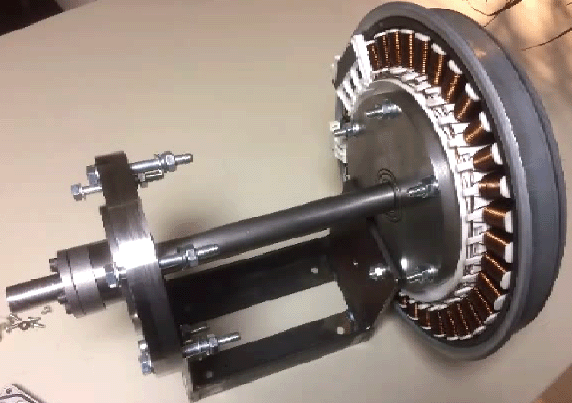 Doing that involves precision metalwork and it will probably be necessary to balance the rotor to avoid vibration when it rotates at high speed, typically 3000 revolutions per minute to drive the alternator. This metalwork can be done by a local metal fabricator business if you do not have the necessary equipment or skill to do this work. For testing purposes it might be more convenient to use a different motor for a “proof of concept” test. One 3-phase motor from China looks particularly suitable as it is low cost and has two bearings on the drive shaft. One motor can be the drive motor and a second identical motor could act as the generator: 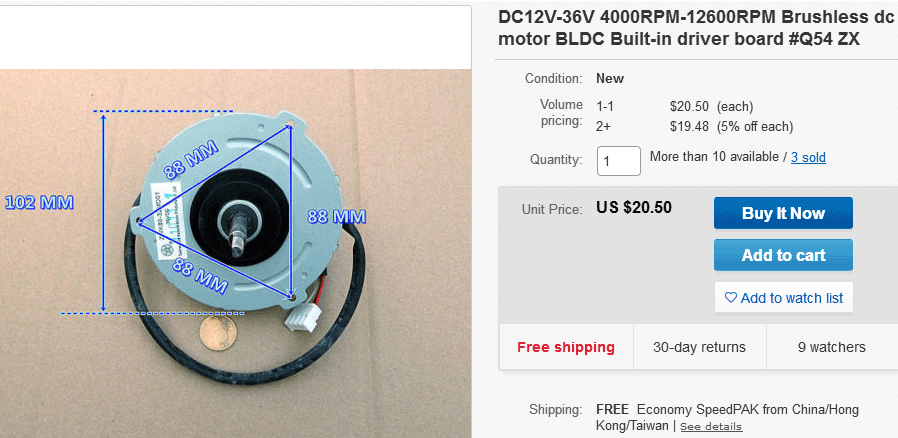 Aligning and coupling the motor and generator shafts is not difficult and components from model aircraft and radio controlled car shops can be used. The simple-circuit.com schematic for the motor drive is based on 12 volts throughout: 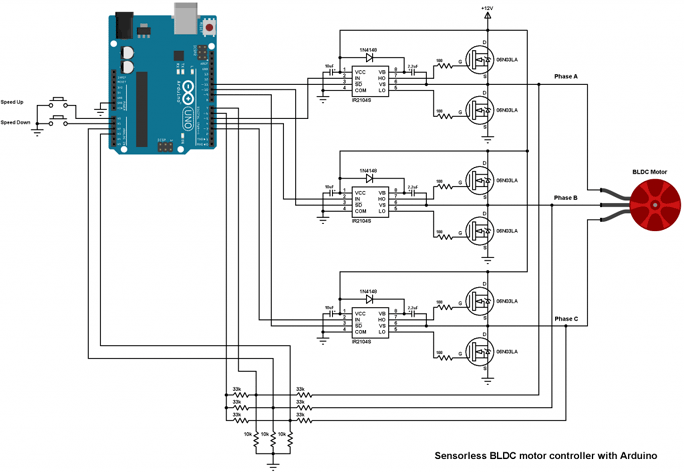 The challenge for this generator design is to modify this circuit so that the Arduino is run on 12 volts while the motor is run on 400 volts. Because the motor has no sensors, the simple-circuit people use back-EMF voltage feeds from the motor to determine its position during rotation: 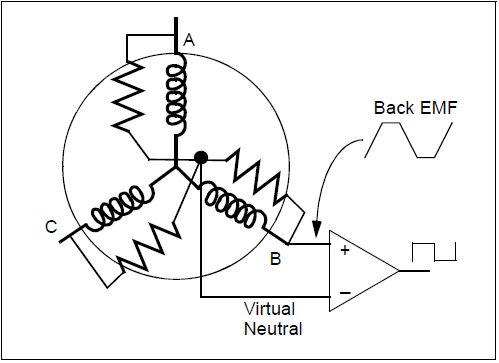 The comparator shown in the diagram is actually inside the Arduino board, but our problem is that we are feeding the motor with 400 volts instead of just 12 volts. So, what voltage will be fed back to the Arduino? Originally, the simple-circuit.com circuit shows a resistor divider pair of 33K / 10K which drops the voltage to about one third before feeding it to the Arduino. But it is the back-EMF which is allegedly being fed back and that is generated by the coils and in a 12 volts system that is likely to be very much in excess of 12 volts and could be in excess of 1000 volts. Pulsing the coils with 400 volts might well not alter the back-EMF by much as the coils are not changed at all. This is the problem and testing is needed using your own motor to determine what is coming back from the motor. It is suggested that the resistor divider pair of resistors be changed to 1.3M / 10K, or alternatively to 10M / 2.2K. There are cheap Chinese versions of the Arduino board selling for just £5, so it might be a good idea to use one of those for the testing phase of the development. At this point in time we just don’t know the answer, so we will have to see what the development testing shows us. The pulsing of those three coils sets one after the other in sequence, is done by the “controller” unit which is a key component in this design. The controller consists of two parts. The first is an Arduino board which is a general purpose development board - essentially a simple computer which can be programmed from an ordinary PC or laptop. It holds the program in its memory and runs it whenever it is instructed to do so. The second part is an electronics link between the Arduino board and the motor. That link boosts the power fed to the motor using high-power transistors which can feed high currents to the motor, and some other wires which feed information back to the Arduino board to give it full control of what is happening with the motor. The Arduino code can be downloaded as a text file from here The Arduino board looks like this: 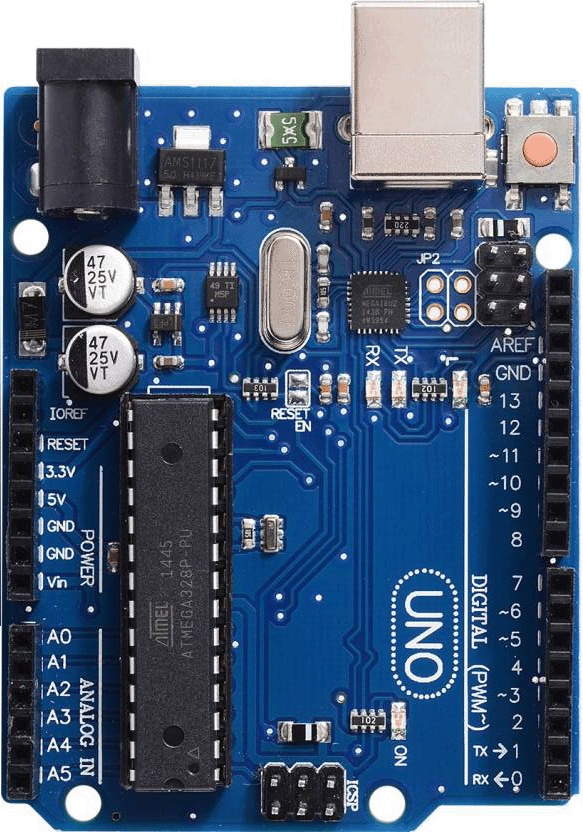 The interface between the Arduino Uno board and the motor, needs the following components: • 6 x IRF840 FET transistors • 3 x IR2104 DIP gate driver IC • 3 x 1.3M ohm 0.5 watt resistors • 3 x 10K ohm 0.5 watt resistors • 3 x 33K ohm resistors • 6 x 100 ohm quarter watt resistors • 3 x IN5408 or UF5408 diodes • 3 x 10uF 25 volt capacitors. • 3 x 2.2uF 25 volt capacitors. • 2 x pushbuttons • 12V source • Construction board and connecting wires These components are connected up like this: We need to connect this Arduino Uno up to drive one of the three phases of our three-phase motor, so to do that we will use an IR2104 driver chip and an IRF840 Field Effect Transistor (“FET”) to feed our 400 volt power supply to the motor at some 14,800 pulses per second. So, the power drive for the first phase is like this: 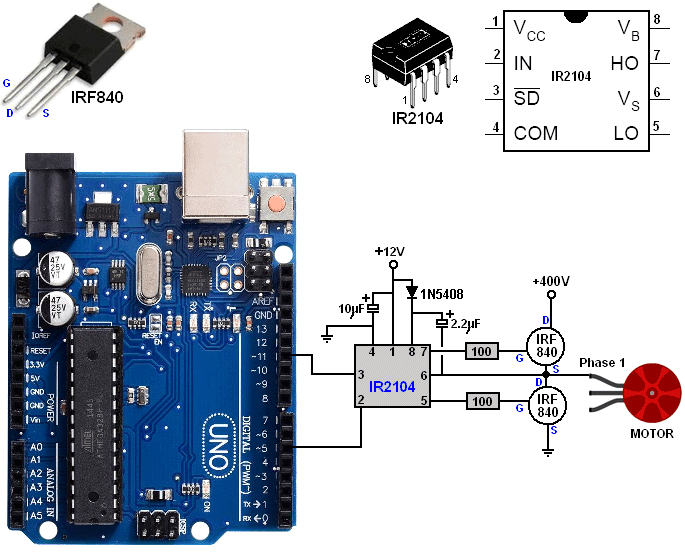 The 1N5408 diode can handle high voltages and so protect the 12 volt section of the circuit from the high voltage section feedback. The power drive for the second phase is: 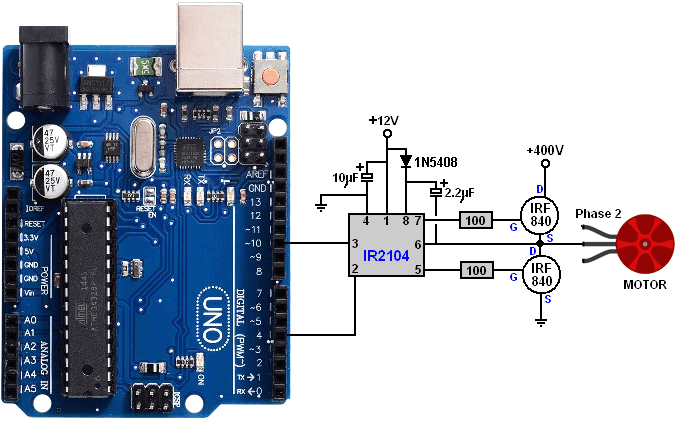 And the power drive for the third phase is: 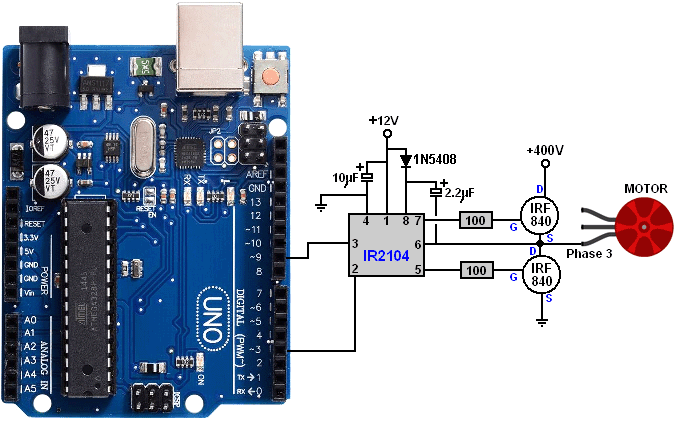 But we also need to provide the Arduino board with feedback information to let it know where the motor is in it’s rotation. That is done by sensing the Phase connections to the motor, and using guessed voltage divider resistor values like this: 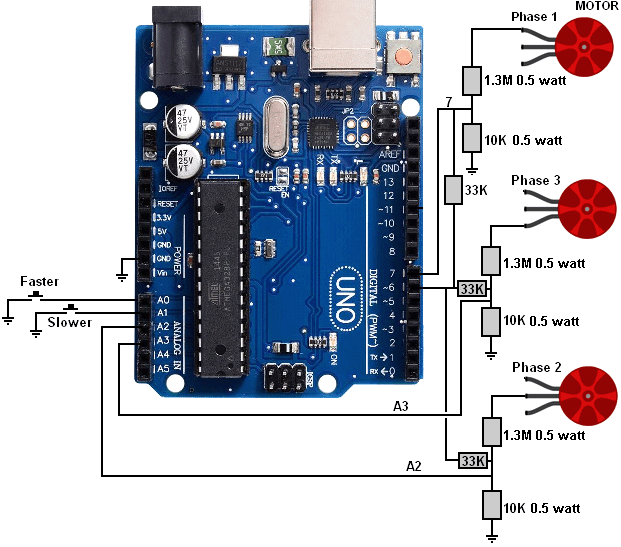 First, a word of warning here. You can get a shock from any voltage above 30 volts. If the voltage is Alternating Current at a frequency under 100 cycles per second (as is supplied by your mains wall socket) then that shock can be serious. The power supply described here is very easy to understand and to make BUT if you get a shock from it that shock is very likely to kill you !! Disclaimer: You are responsible for your own actions. This document is for information purposes only and if you decide to make or experiment with voltages higher than 12 volts, then you and you alone are responsible for your actions and neither the author, the web hosting service nor anyone else is responsible for what you do or for any damage or injury caused by your own actions. Having said that, please understand that if you are careful and sensible, there is no danger in constructing this power generator in spite of the very high 400 volt input to this power driver circuit. To stay safe, you make all the necessary connections and insulate them before you apply power. So, we need to construct an electronics component board to connect the Arduino to the phases of the motor. Please remember that this board will be carrying 400 volts and so you need to enclose the board in a plastic box before powering it up. The suggestion for a physical layout for the components is based on using stripboard like this:  These boards come in many sizes and are very versatile. However, because the pin spacing of integrated circuit is just 0.1 inches, the solder joints can be very close together and that does not suit a beginner to soldering, so ask a friend for help in soldering unless you are already expert.  We want to place these components on the board, so perhaps a layout like this might be suitable: 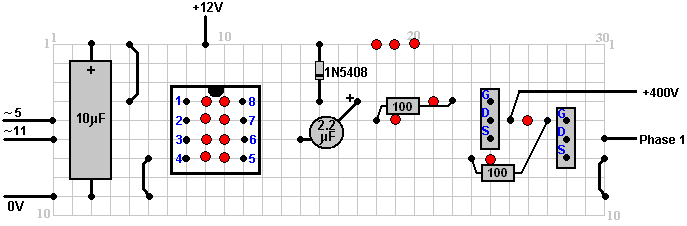 The red circles show where the copper strip on the underside of the board is to be broken. This physical layout has not yet been built and tested, and so is only a suggestion. You can make three separate boards, one for each phase or you can place all three circuits on a single board. Integrated circuits are heat sensitive so I suggest that you use a socket and solder it in place and then plug the chip into the socket when everything is cool. An 8-pin socket looks like this:  Here is a possible physical layout for the Arduino / Motor interface using a piece of strip board: 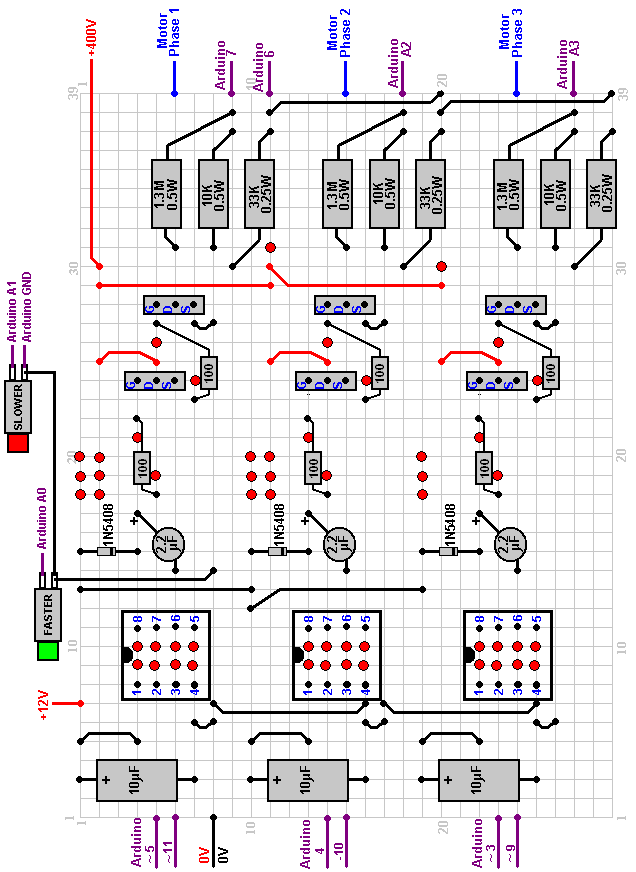 Built in this layout it is likely to damage the Arduino board as there are issues with using 400 volts. It may be necessary to introduce high voltage fast diodes to protect the circuitry from the high voltage. A diode such as the 650 Volt 8 Amp SCS306AHGC9 diode which looks like this: 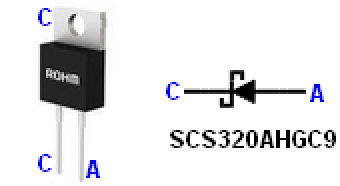 This changes the possible physical layout to: 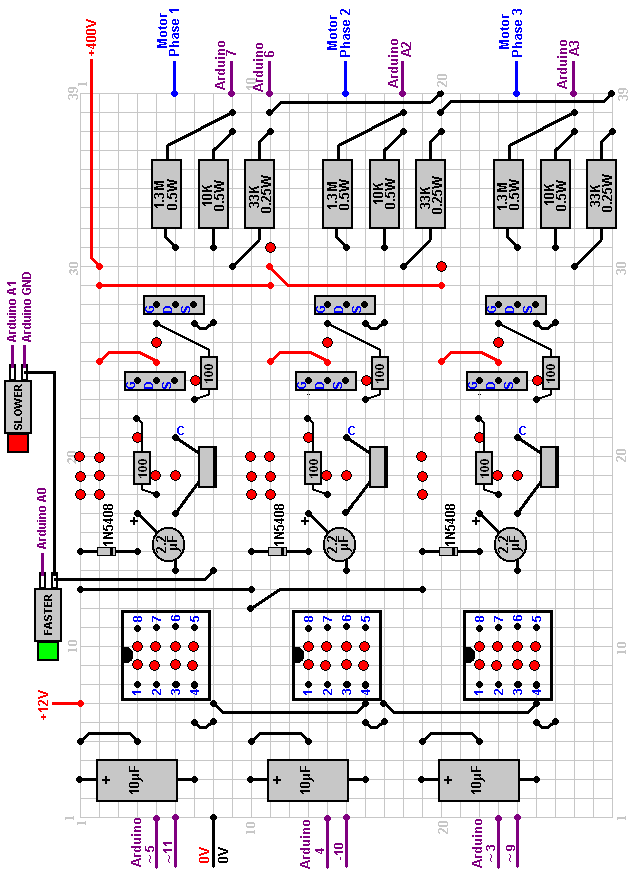 We come now to the difficult part of producing a 400 volt power supply able to supply about 2 amps at that output voltage. This arrangement has been suggested:  The transformer shown here is not at all easy to find as very few people want to produce 400 volts DC from 220 volts AC. One important point here is the “battery charger”. It needs to supply hundreds of watts of electrical power back to the input of the inverter continuously in order to make the system self-powered. Consequently, it needs to be a professional level unit so heavy that it needs wheels and a handle to move it around. First, there is a car battery and that feeds an inverter like this particular unit which is an European inverter which produces anything from 220 to 240 volts with powers of 2000 watts continuous and 4000 watts peak output. It is also cheap at £25 delivered and it has two handy USB output power sockets as well: 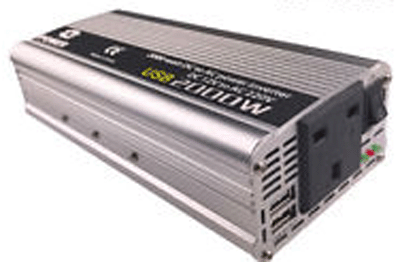 In the absence of a suitable step-up transformer one possibility is to use a “DC chopper” circuit which could take the 12 volts from the car battery and produce a 400 volt 20 kHz output directly in one operation. A DC chopper of that type looks like this: 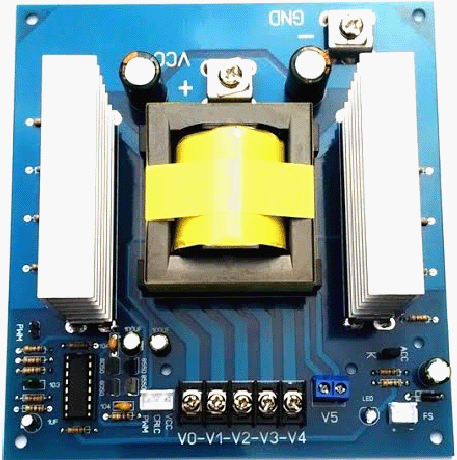 While a DC chopper power supply is not suitable for all applications, it is felt that this cheap unit costing US $35 from aliexpress.com would be suitable for this generator project. However, please understand clearly that your local power company is most unlikely to allow you to connect your generator up to their wiring which goes to your fuse box. Consequently, it is better if you use your new supply of electrical power as if it were an emergency back-up generator. That is, you connect it up to your appliances without connecting it to any external power supply or wall socket. Let me stress that if you were to construct a generator system like this, you do not connect it to the wiring of the local electricity power supply company. For example, the electrical mains supply wiring will come into your household fuse box or contact breaker box. Do not connect your generator wiring to that same box but instead treat your generator in the same way as an emergency generator, feeding the generator output directly to your washing machine, electric heater, vacuum cleaner or whatever through an extension cable and not through a wall socket. If you are very keen to have your new generator connected to your fuse box, then be sure to install a “Break-before Make” heavy duty switch to disconnect the outside power supply cable before your generator output is connected to the fuse box. This is important because if a fault occurs in the mains wiring and they turn off the mains power while they fix it, the workmen might get a fatal shock from your generator even though their wiring is supposed to be switched off. We come now to the alternator which produces the electrical output which is the whole point of the system. All of the components and methods described so far have the objective of spinning the alternator indefinitely in order to provide electrical power for a household. With a large motor, the system described so far is perfectly capable of driving an alternator of any power level up to ten kilowatts without altering any of the components. So, the size of the alternator which you buy is up to you. Personally, I would consider an output of five kilowatts as being adequate to excessive, but then my electrical needs are probably far lower than yours might be. Anyway, in the UK one supplier is MachineMart and they offer three different alternators. They look like this and each needs to be driven at 3000 rpm: 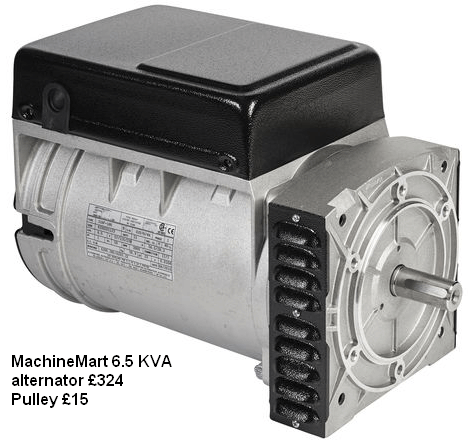 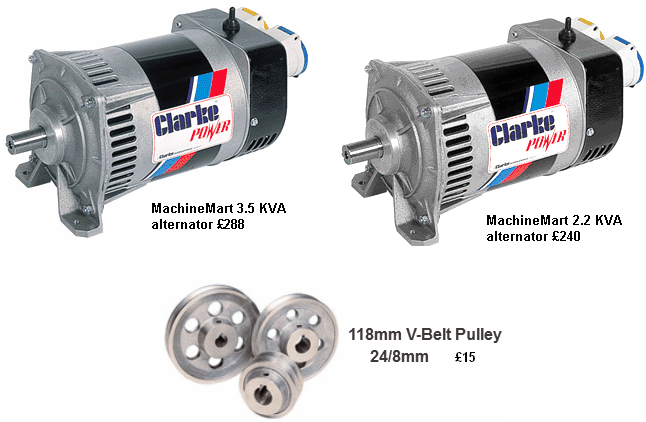 Looking at the small price difference between the alternators, there seems to be very little reason not to pick the 6.5 KVA unit even if your expected current is likely to be well below that rating. If you limit the output current to, say, 3 kilowatts, using a fuse or a circuit breaker, then you can install a higher capacity alternator. That will not increase the load on the motor and as the alternator is always running at less that its design current, the alternator will run cooler. The final step is to mount the motor unit and alternator unit together so that the motor can drive the alternator to provide the required electrical output. Aligning the shaft of a large motor with the shaft of an alternator is not an easy thing to do unless you are skilled at such work. For the average person it is easier to use a pulley wheel on the motor and a pulley wheel on the alternator, linking them with a belt drive as is done in a car: 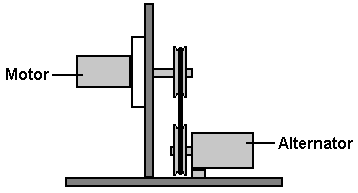 Patrick Kelly http://www.free-energy-info.com http://www.free-energy-devices.com http://www.free-energy-info.tuks.nl |