|
There is nothing magic about free-energy and by “free-energy” I mean something which produces output energy without the need for using a fuel which you have to buy. Free energy devices have been around for a very long time now. I have stood beside a water mill and it’s power is scary as it could crush you in moments and never even notice. That mill is on a quietly flowing small river and it can operate at any time day or night without having to pay anything for the power which it uses. It will have cost quite a bit to build the mill in the first place, but after that, it produces major power year after year. Most free-energy devices are just like that as it costs to build them in the first place, but after that they run for free. This presentation is mainly for people who have never come across free-energy and know nothing about it. So, each chapter deals with just one device and tries to explain it clearly. In 1939, William Skinner of Miami in Florida, demonstrated his fifth generation generator powered by spinning weights. His demonstration is here at time of writing. He shows his design powering a twelve-foot lathe, a drill press and a power hacksaw, all simultaneously. The newsreel commentator states that the output power was “1200% of the input power” which is COP=12 but it is highly likely that he should have said “1200 times” rather than “1200%” because he continues to state that using the design would allow a one-horsepower (746 watts) input power to power 3,500 homes. If it were COP=12 then each of those 3,500 homes would receive less than 2.6 watts, which is clearly wrong. At the much more likely COP=1200, each household would receive on average, 255 watts, which might be just possible in 1939 when few appliances were electric. Anyway, Skinner’s impressive equipment could be driven by a single cotton thread drive band while powering his whole workshop. It looked like this: 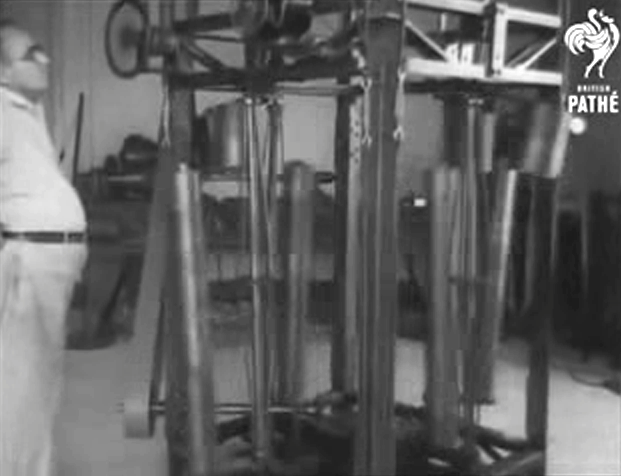 This design has four nearly vertical shafts, each braced to give additional rigidity. These rotating shafts pass their rotating power to the mechanical output drive belt seen on the left. Each of these rotating shafts has a heavy weight in the form of a thick, short cylinder mounted high up near the top of the shaft and what is probably an even heavier weight in the form of a long narrower cylinder attached near the bottom of the shaft as seen just to the right of the output drive belt. These four identical sets of shafts with their pairs of weights spin two or three times per second and produce the whole of the output power. As far as I am aware, Skinner never patented his design or disclosed how it worked. However, the operating principle is very simple indeed although it may take you a while to grasp how it works. You can check this out quite easily for yourself if you have access to an old-fashioned chair with four rigid legs like this: 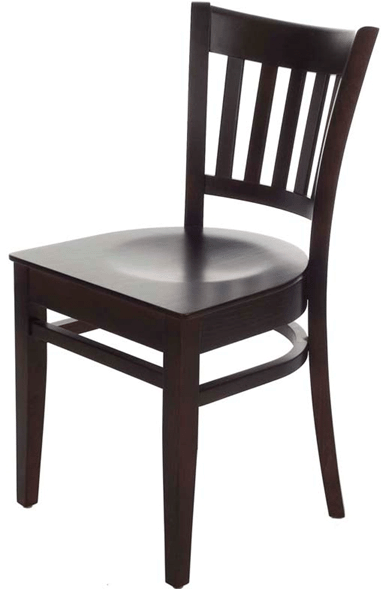 Tilt the chair over so that it is balanced on one leg. You will notice that almost no effort is involved in keeping it in that position as all of the weight is supported by the floor through just one of the legs. Now, move the top of the chair by a very small amount and keep the top of the chair in that position. You will notice two things: first, very little effort was needed to move the top of the chair and second, the chair now swings around and becomes stationary on the same side that the top of the chair was moved. Notice two other things: the chair swung around because of your moving the top slightly and you did not swing it around, and if the chair is heavy, the amount of energy in the swinging chair is very much greater that the amount of energy which you applied to the top of the chair. If you were to keep moving the top of the chair in a tiny circle, then the chair will spin around continuously for however long that you choose to wobble the top of the chair. The amount of energy in the spinning chair is very much greater than the energy which you are expending to make the chair spin. So from where is that extra energy coming? What is happening is that the chair swings round under gravity to reach the lowest possible point for it with the new position of the top of the chair. But, before it can get there, you move the top of the chair further around and so the chair has to swing further in order the reach the lowest point. But before it can get there, you move the top again ….. The chair keeps swinging round and round, pulled by gravity, for as long as you choose to keep moving the top. But, no matter how heavy the chair, very little effort is needed from you to cause the spinning. Skinner had a mechanism at the top of each vertical drive shaft, and that mechanism kept moving the top of the shaft in a small circle while allowing the shaft to rotate freely at all times. That caused the very heavy weights attached to the shaft to keep spinning around, and he used that power of the heavy spinning weights to power his whole workshop. Moving the top of the shafts required so little power that he used a 93-watt electric motor and to show that he was not even using all the power of that small motor, he used a single cotton thread as a drive band to move the tops of the four power output shafts. His mechanism looks complicated. This is partly due to the fact that there are four identical power shafts with their weights, mounted in the one compact frame and that makes the device look more complicated than it really is. It is also due to the fact that the system shown in the newsreel is William’s fifth version of the device. It is likely that his earlier, much more simple versions worked well and encouraged him to build even fancier versions. There are two forums where members of those forums are trying to work out exactly how his final version machine worked and then replicate the design for current day use as it is a neat system for accessing additional usable power. Those forums are here and here. It needs to be remembered however, that it is not actually necessary to replicate William’s fifth version, but instead it would be quite enough to use the principle of the spinning chair to produce a simple mechanism where the input power is far less than the output power. If we consider what is happening, then perhaps we can understand Skinner’s complicated-looking arrangement. We can consider just one of the four axle shafts The large weight is spinning around in a circle and that motion is then used to power the output shaft. In order to reduce the effort needed to spin the weight, the axle shaft has been made thinner and four bracing rods have been used to brace the shaft in exactly the same way that sailing yacht masts are usually braced with “spreaders” to hold the bracing out from the mast and so give greater overall stiffness. So we can ignore those bracing bars as they have nothing to do with the actual operation of his design, but are merely his choice out of many different construction options. Remember the spinning chair and consider what has to be done to spin Skinner’s heavy weight. The top of the shaft has to be moved in a small circle. Looking down from the top the situation is like this: 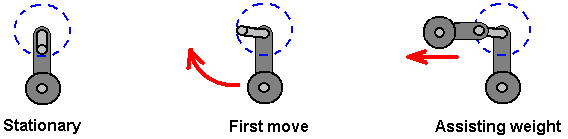 When the system is switched off, the weight attached to the bottom of the shaft comes to rest directly underneath the top of the shaft. When the system is started again, the first move is to shift the top of the axle shaft ninety degrees around. This is the start of the rotary movement and initially, the movement is slow as it takes the heavy weight some time to get moving. To reduce the effort of moving the top of the shaft ninety degrees ahead of the big lower weight, Skinner has added a weight at the top to assist the movement in that direction. 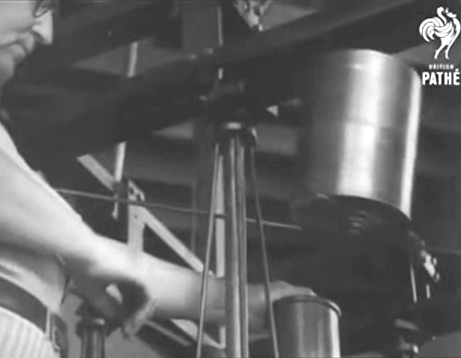 Skinner also took advantage of his very large workshop to use a belt-driven mechanism above the top of the shaft, in order to reduce the effort of moving the top of the axle shaft even further (to the level where it could be driven by a cotton thread). He used four separate identical shafts in his construction for two reasons: first, the overall output power is increased and second, any sideways forces stressing the mounting frame are matched on every side, which is helpful when you have heavy weights on a rotating arm as Skinner did. As the output shafts appear to be rotating at about 150 rpm, Skinner opted to use a straight mechanical drive. Back in 1939, electrically-driven equipment was not as widespread as it is today, but nowadays we would probably prefer to have an electrical output rather than a mechanical drive although that mechanical drive could be used for driving pumps and other low-speed devices. So, we are faced with introducing some form of gearing which can raise that 150 rpm to the much higher level preferred by most alternators. While it would be possible to use an ordinary 12-volt motor as a generator and produce a 12-volt electrical output, it is likely to be more convenient to use an off-the-shelf electrical generator, perhaps a very low-friction one like this which has been designed for wind-power operation and which has a 12V or 24V 3-phase output: 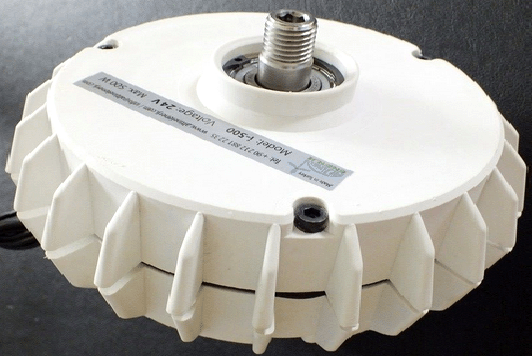 The fact that the output is 3-phase can sound a little daunting, but the conversion to DC is quite straightforward: 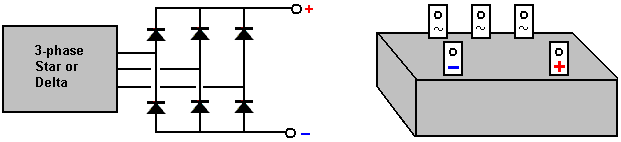 The output can be converted to DC with six ordinary diodes or a integrated diode arrangement can be used where there is a connecting tag for each of the three outputs and a separate tag for the DC Plus and for the DC Minus. The currents involved are quite high as 400 watts at 12-volts represents more than 33 amps and the peak output of 500 watts is a current of about 42 amps. For that reason, the 3-phase rectifier blocks are rated at 50 amps which sounds very high until you do the calculations and discover what the current is likely to be. It should also be borne in mind that the DC output wire has to carry that level of current on a continuous basis and so fairly robust wire is needed. If the voltage were 220V then the wire would be carrying more than 9 kilowatts at that current flow, and so the normal 13-amp mains wire is just not sufficient and instead, we need to use thick wire or more than one strand of wire for both the Plus and the Minus connections. This particular generator is not expensive and can output 400 watts of electricity (33 amps) continuously. As the Skinner type appears to be spinning at 150 Hz, a gearing up of the output speed would allow greater output, so perhaps for a home-builder, the physical arrangement might be like this: 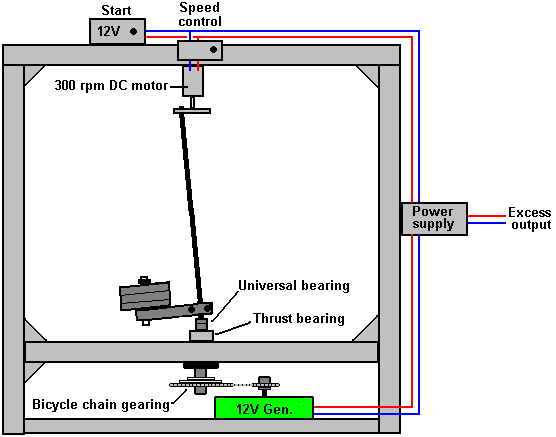 There are, of course, many different forms of construction which might be used, but with each of them, the question is, “how do you make the angled shaft rotate powerfully?”. If you can work out the complexities of Skinner’s fifth version shown in the newsreel, then that would certainly do the job. However, we would prefer a much more simple design and so we do not necessarily have to copy what Skinner did but instead we can just apply the principle which he demonstrated. One possible arrangement might be to imitate the chair experiment using a strong shaft with a weight attached to one side of it, perhaps like this: 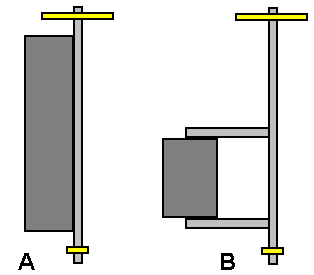 Version “A” uses the weight to stiffen the shaft but doing that raises the centre of gravity of the combined shaft and weight which may not be convenient. Version “B” increases the torque for any given weight by moving the centre of gravity of the weight away from the centreline of the shaft by means of extension arms. As the shaft rotates at a constant rate, the load on the shaft will be essentially constant and there should not be any significant flexing of the shaft although it might bend and remain with that same bend during all of the time when it is spinning if the weight is very high relative to the stiffness of the shaft. We do have to input some power to rotate the top of the drive shaft, but if we arrange things in any one of the hundreds of viable configurations, then the output power will be massively greater than our input power. An alternative arrangement which allows speed control (and so, output power control) is to take some of the generated output of electricity and use that to power an electrical drive which positions the top of the drive shaft. There will be many different ways of achieving that movement. One method for doing this might be: 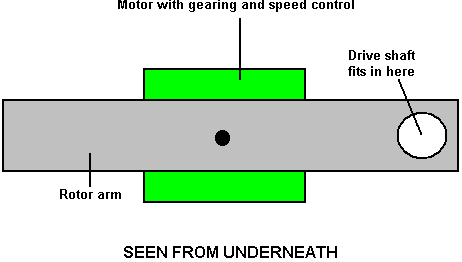 Here, the small electric motor shown in green is geared down and used to move the top of the drive shaft at whatever rate of revolution that we consider to be satisfactory, using a standard DC motor speed controller. It should be noted that no matter what angle is chosen for the axle shaft, that is always a constant relative to the motor arm moving it round in the circle at the top of the shaft. This means that no roller bearing is needed as there is no relative movement and the shaft will automatically take up that fixed angle. The drive motor arm moving the top of the shaft will probably not be long, as Skinner appeared to be moving the top of his shafts by about 40 mm away from the centreline of the bottom pivot, making only one degree or so for the angle of the shaft on every side of the vertical. It is, of course, not essential to convert the output power to electricity and instead it could be used in the same way that Skinner did, driving mechanical equipment such as water pumps for irrigation or extracting water from wells, milling operations for processing grain or for operating any form of workshop equipment. It is also not necessary to build the device anywhere near as large as Skinner did, and small versions could be used to power lighting systems, operate fans or cooling systems or for any other minor household requirements. The power output from the machine can be increased by increasing the weight attached to the output shaft, or by increasing the length of the arm holding the weight, or by tilting the output shaft through a greater angle (which increases the input power needed, but probably not by much), or perhaps by scaling the whole thing up so that it is physically bigger. Skinner’s design uses stiffening bracing on the output shaft, which suggests that the lighter the shaft is, the better the performance. Because of this, a prototype build might use a timber shaft of perhaps, 33 mm square as that is both light and very strong and rigid and it is a good shape for ensuring that there is no slipping of the arm which supports the weights. The top of the shaft is reduced slightly so that it has a circular cross-section. A 300 rpm motor rotates at a maximum of 5 turns per second and so is suitable for rotating the axle shaft. A suitable, low-cost motor of that type, looks like this: 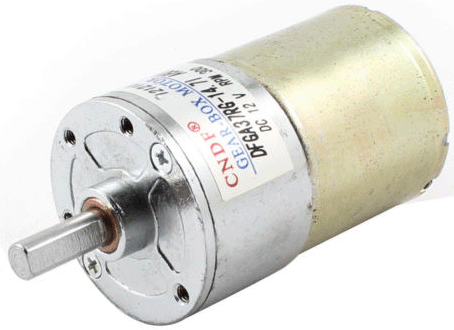 The motor needs to be linked to the shaft in a simple way which ensures that the shaft will not slip: 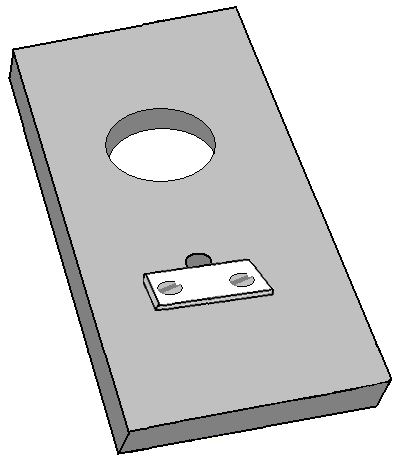 Perhaps cutting a suitable sized hole through a strip of material and using a strip of metal pressed into the flat face of the motor drive shaft (in addition to the hole being a tight push fit) would be adequate for this. A screwed collar or layer of epoxy resin holds the plate firmly to the motor as the plate is positioned below the motor and so gravity tends to pull the plate off the motor shaft at all times. It would initially be assumed that a ball bearing or roller bearing would be needed in this motor arm, but that is not the case as the axle shaft does not rotate relative to the motor arm and while the axle shaft can be a loose fit in the hole, there is certainly no need for a bearing. A commercial DC Motor Speed Controller can be used to bring the shaft rotation speed gradually up from a stationary start to the chosen rate of revolution: 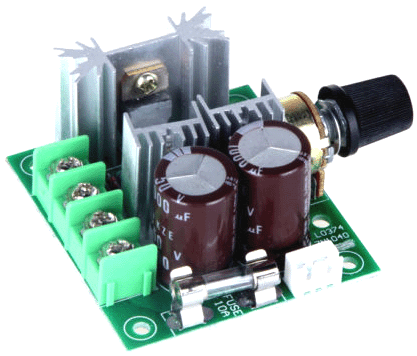 Using a commercial module like this means that no electronics knowledge is needed to build a working generator of this type. There are many options for providing the necessary weight which drives the generator. One possibility is to use a barbell shaft with as many weights as are required, that being a very simple alteration: 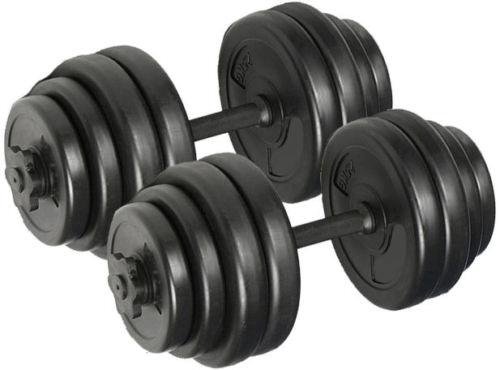 One of the hand grips can be cut and used directly as part of the mounting, perhaps like this: 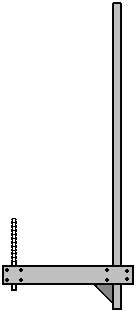 This simple arrangement allows the weight discs to be added and secured in any combination desired. As dumbbells are supplied in pairs, there are four discs of each side which allows a wide range of weight options going up in jumps of just 1 Kg which is very convenient. If the axle shaft has a square cross section, there is no tendency for the lever arm to slide around the shaft The following sketches are not to scale, but one form of construction might be: 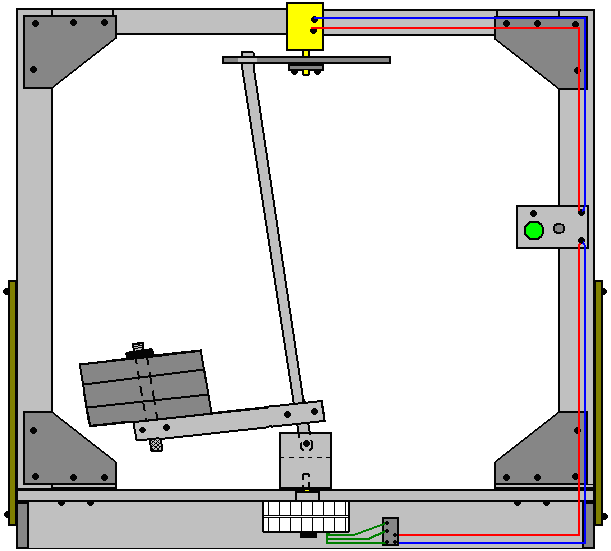 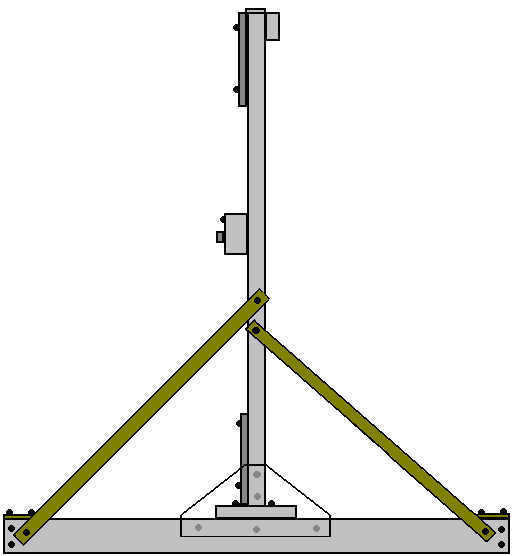 For this style of construction, four pieces of, perhaps, 70 x 18 mm Planed Square Edge timber are cut to perhaps 1050 mm and two 33 x 33 x 65 mm pieces epoxied and screwed to two of the pieces, 18 mm in from the ends:  Then the four pieces are screwed together while resting on a flat surface: 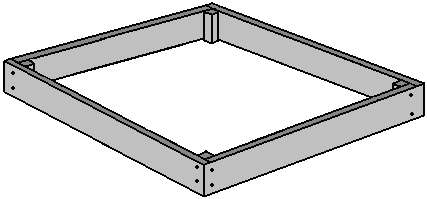 Then corner bracing triangles of MDF are screwed in place: 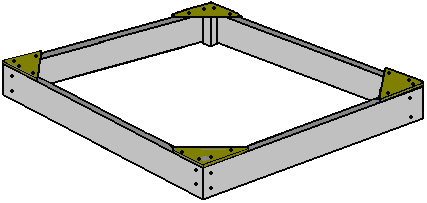 Then a 130 x 25 mm thick plank is attached across the width at the centre point and screwed in place:  Next, two lengths of the 18 mm thick timbers about 180 mm long are epoxied and screwed to the centre of the 25 mm thick plank, leaving 70 mm clearance to the end of the plank:  Two timber strips 1350 mm long, are cut and erected vertically, being attached by screws coming upwards through the 25 mm thick plank, and by MDF bracing triangles on one side and across the lower end of the verticals. If a spirit level is used to ensure that the vertical timber is actually vertical, then first, the four corners of the floor frame need to be weighted down to overcome any twisting and the floor frame confirmed to be actually horizontal before attaching the vertical timbers: 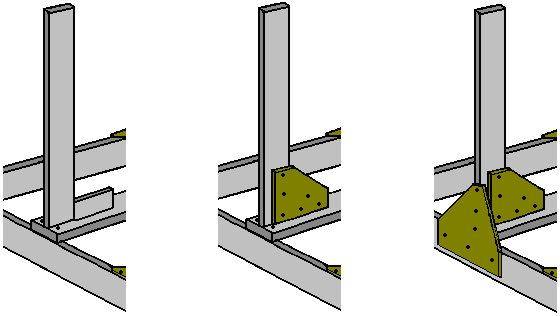 Each vertical needs to be braced on both sides with diagonal strip, either metal or timber: 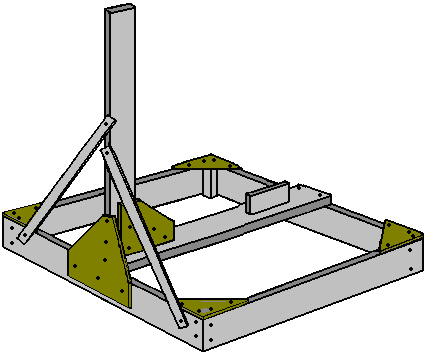 An 18 mm thick timber strip is screwed to the tops of the verticals. This deliberately positions the timber 18 mm off centre as the motor which rotates the top of the axle shaft has to be attached to the middle of this newest timber and that places the motor shaft very close to the central point of the base:  One slight disadvantage is that a packing piece is needed for the triangular MDF bracing pieces which increase the frame rigidity at the top:  At this stage, the construction will look like this:  At this point, the 300 rpm motor with it’s actuator arm and the speed-control box can be fitted. The motor is located centrally, and the control box can be positioned anywhere convenient. The control box is merely a 12-volt battery pack of 1.2V NiMh AA-size batteries connected through a push-to-make press button switch and the commercial DC Motor Speed Controller, to the 300 rpm motor. With this arrangement, the motor can be powered up by pressing the button and adjusting the speed slowly up from stationary, getting the rotor weight moving gradually faster and faster until its best operating speed is reached. When everything is in place, then the rectified output of the alternator is fed into the control box, so that the Start button can be released and the device becomes self-powered from part of the output power. The initial step looks like this:  It should be explained that, with the exception of the 25 mm thick plank, all of this construction is only loaded very lightly as rotating the top of the axle shaft does not take much power or effort at all. Almost all of the rotating weight is located at the bottom of the axle shaft and that weight rests on some form of bearing which rests in the middle of the 25 mm plank. For a small version of the generator, such as this one, the rotating weight does not need to be all that great and so, the forces generated by the weight and its rotation about the bearing need not be a major thing. However, in spite of the fact that we are only dealing with limited forces which can be handled by simple components, people may be inclined to use a thrust bearing instead of allowing the weight to rest on the shaft of the alternator. A bearing of that kind may look like this: 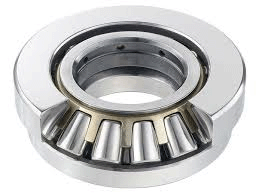 Here, the base and inner ring do not move while the top outer ring revolves freely and can support a major load while it rotates. If we choose to use one of these, then an arrangement like this could be used:  This combination has a cap (shown in yellow) with a central vertical shaft (yellow) attached to it, tightly encasing the upper ring of the bearing whose lower ring is securely attached to the 25 mm thick plank (grey) perhaps using epoxy resin (purple). This allows free rotation of the upper ring and vertical shaft while carrying significant loading. The power take-off in the arrangement shown is from the shaft projecting beneath the plank. Generally speaking, the electrical power output increases with increased speed of rotation, so gearing the alternator up so that it rotates much faster than the axle shaft is desirable and this arrangement may be convenient for that. If it is important to have the power take-off above the plank, then a strong bracket can be used to raise the bearing high enough above the plank to accomplish that. There are two separate forces acting on the bearing. One is always downwards as the bearing supports the rotating weight: 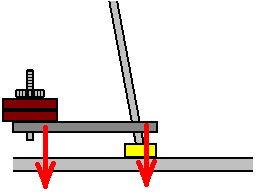 Then there is the sideways forces caused by the rotation of the (unbalanced) weight:  This sideways force is normally considered to be a major problem, however, in this instance, the weight is not being whirled around and trying to escape from the shaft in a horizontal direction, but instead, the weight is turning under gravity powered by its own weight, and the forces generated are quite different and in a different direction. Also, the rate of rotation is very small compared to the speeds which we automatically think about when considering an orbiting weight, typically, this rotation only being between 150 and 300 rpm. As far as the loading on the axle drive motor is concerned, the situation is like this: 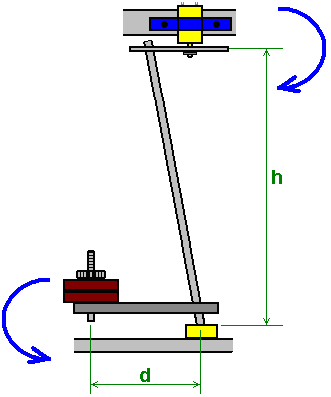 This is the position when at rest. The pull on the motor shaft at the top of the axle shaft is W x d / h where W is the weight at the end of arm d. The situation changes immediately the top of the axle shaft is rotated and the weight W starts to swing under the influence of gravity. I am told that the axle shaft needs to be light. With small weights, a rigid wooden shaft is adequate and it does not flex under the loading. I am assured that the bottom of the axle shaft needs a universal joint and a major version of this generator where the weights are very high, that is certainly true as the shaft will flex if designed to its minimum specification, but under these much less stressed conditions, there will be no flexing of the shaft when it is pulled sideways and as the shaft angle is a constant, I do not believe that any such joint is necessary. However, many people will wish to include one. These bearings come in different forms, and one of them looks like this: 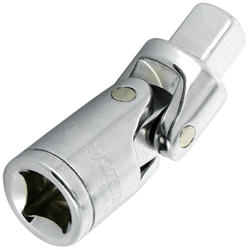 It must be remembered that if a joint like this is fitted, then it will not be in constant motion, that is, the joints will take up one particular position and will maintain that position during the whole of the time that the generator is in operation. A compromise would be to provide a hinged movement in one plane by pivoting the axle shaft joint just above the thrust bearing:  The electrical connections are quite straightforward: 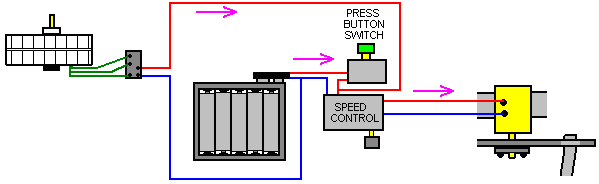 The 12-volt battery pack of 1.2V AA-size batteries is connected to the motor speed controller when the button of the press-button switch is held down. This powers the motor, and as the axle shaft speeds up progressively, the generator starts producing power which is always fed to the speed controller box. As soon as the generator gets up to speed the press button switch can be released and the system runs on power produced by the generator. Excess power will be drawn from the generator output, but those links are not shown in the diagram. Patrick Kelly http://www.free-energy-devices.com http://www.free-energy-info.com |