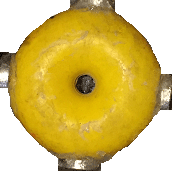
Denis Sabourin has built a generator which operates well in that it runs indefinitely, self-powered while charging a cell phone overnight. The construction is very simple. The heart of the generator is a small motor with a yellow plastic float from a fishing net glued to it to make a lightweight rotor which has four magnets glued to it:
 The rotor can, of course, be constructed from lightweight materials if it is difficult to get a float from a professional fishing net. The magnets are N52-grade 20 mm diameter neodymium magnets 5 mm thick. The motor is powered by a 3.7V Lithium ion battery and there are eight output coils positioned around the rotor. The coils are connected in pairs with the four pairs powering the system.  Each coil is wound with two strands of 0.19 mm diameter enamelled copper wire, which is swg 36 or could be AWG #32. Each strand weighs 50 grams and both strands are wound at the same time. That arrangement allows the coils to be connected as bi-filar coils if that is desired. The central core of each coil is made of plastic and is 8 mm in diameter with a 6 mm diameter hole in the centre, and the completed winding is 30 mm diameter on a coil which has 33 mm of winding space between the ends. When the winding is completed, each coil is given a layer of electrical insulating tape to protect the wires rather than to provide any additional insulation. So, the overall arrangement is: 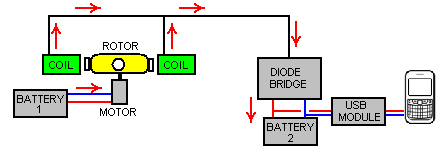 Here, Battery 1 powers the motor which spins the rotor. The powerful rotor magnets passing close by the set of eight coils generates an alternating voltage which is rectified by the diode bridge and used to charge the mobile phone battery through a 5-Volt USB module. Only two of the eight output coils are shown in the diagram above. This system works well, charging Battery 2, but the Battery 1 gradually runs down as it is powering the motor but is not being recharged. To deal with this situation, Denis uses a switching box which powers a relay for ten seconds once every ten minutes. The relay contacts are used to disconnect the charging current from Battery 2 and pass it instead to Battery 1: 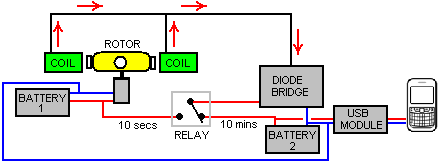 While there may be easier ways to achieve the required result, here are details of the switching box which Denis uses. It has three stages: Stage 1 provides the 10 minute timing using a 555 timer chip as that is the most convenient. However, the problem with simple circuits with a long cycle time is that the time interval is determined by the length of time it takes for a capacitor to charge up. That needs a large capacitor and a very small charging current. BUT large capacitors leak the charge away unless they are high quality capacitors. The highest quality is a tantalum capacitor and the largest available is 47 microfarads, so two in parallel are used to give about 100 microfarad. The time delay with 100 microfarads needs a charging resistor of about 3 megohms. Going for the most simple version of the circuit (one which has equal On and Off times) makes the circuit this: 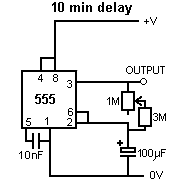 And to get a little control over the time period, the resistor is made from three 1 meg resistors and a 1M variable resistor. The result is a circuit which is On for about 5 minutes and Off for about 5 minutes. That is, the output on pin 3 goes high for four minutes and then low for four minutes. The low is about 0V and the high is about 2 volts below the supply voltage. The supply voltage must never exceed 15 volts as the 555 chip is instantly destroyed by an over voltage power supply. The second stage is this: 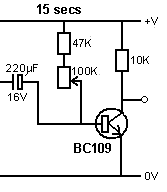 The transistor is a high-gain low current type and it is normally On which costs about one milliamp. The capacitor charges up during the four minute interval and when the 555 timer voltage goes low, the capacitor drives the transistor base low, switching the transistor off and causing its collector voltage to go high. However, the capacitor charge can only hold the transistor off for a short period of time and with a 100K resistor across the capacitor as shown, the transistor is off for about 10 seconds. To allow some control over the time, the resistor can be varied from 47K to 147K but the overall time of this stage will always be short. The third stage is to drive the relay with the full supply voltage and a low cost very high gain transistor is used for this: 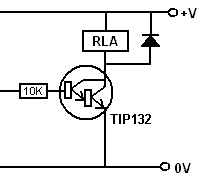 The current into the base of the TIP132 transistor is about half of one milliamp and the transistor minimum gain is 1000 so the relay is fed with up to 500 milliamps. Of course, the relay does not draw that much current, but it does get the full battery voltage across it. The diode is just to protect the transistor from reverse voltage at switch-off. The whole switching box circuit is then: 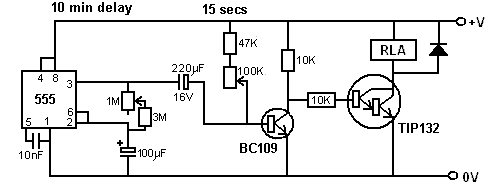 A working physical layout for this circuit can be: 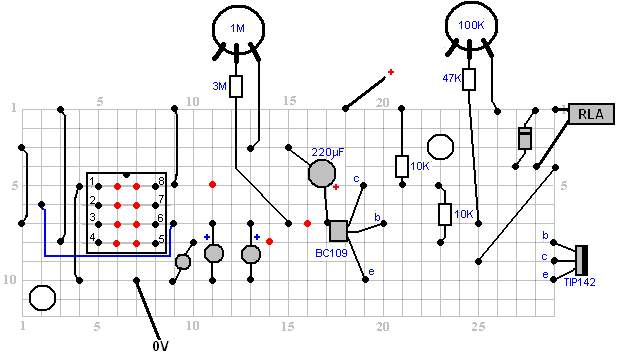 In this diagram, the red dots indicate a break in the copper strip underneath the board and the variable resistors allow a fair degree of adjustment of the timing periods. Please remember that the 555 timer chip will be destroyed immediately if it is fed more than 15 volts, so a 12V battery should be your highest supply. However, the circuit works well when driven by a PP3 size 9-volt battery. The current draw at 9-volts on the prototype is 12 milliamps rising to 32 milliamps for a few seconds when the relay is being powered. It may well be possible to improve on this arrangement and omit the switching box. This is just a suggestion at this time as the arrangement has not yet been tested. The objective is to keep Battery 1 charged while the circuit is running. If no switching is used, then Battery 1 has to be connected to the charging circuit at all times. But if a fully discharged phone is connected to the system then Battery 1 might have a much higher voltage than Battery 2 and so we need to prevent Battery 1 from pouring its current into the Battery 2. That can be done by using a diode which allows charging current to flow into Battery 1 but no current flowing from Battery 1 to Battery 2: 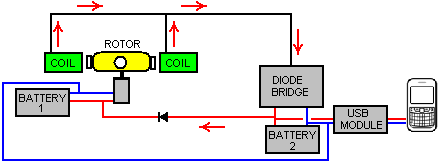 With this arrangement, Battery 2 get most of the charging current, especially since Battery 1 always has a good level of charge on it and there is a small voltage drop across the diode, so most of the charging current will flow into Battery 2. If you wish to limit the Battery 1 charging current further, then a resistor “R” can be placed in the line like this:  The value of the resistor “R” has to be found by experimentation with your own physical implementation, but I would expect the value to be low, perhaps 47 ohms or so. If the light is not required, then all eight output coils can be used for charging. The coils are connected in pairs and Denis has an unusual method of connecting them: 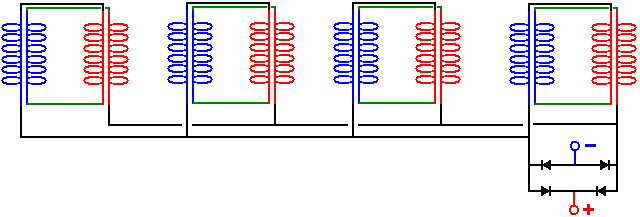 This is not the bi-filar connections which you would expect, but this wiring arrangement has proved to be very effective in practice. A variation on this which I would prefer due to its increased flexibility and the possibility of creating increased output voltage through different connections, is: 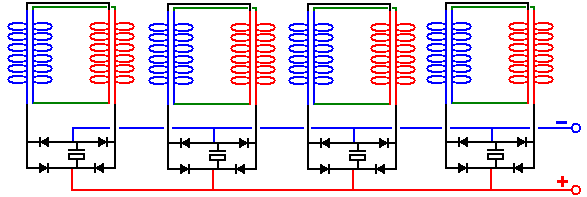 Here, each pair of coils has its own rectification and smoothing capacitor and as such, each pair acts as a small everlasting battery. An alternative to that is to use a voltage-doubler circuit for the rectification to nearly double the output voltage when powering a load: 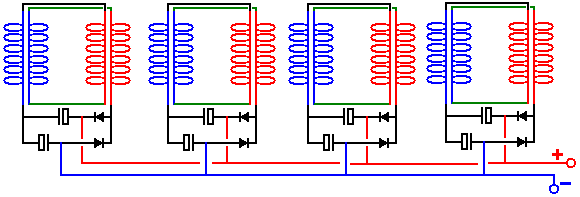 The batteries used in the prototype are lithium ion types with a voltage of 3.7 volts and a capacity of 1200 mAHr. These batteries have worked very well, but lithium ion batteries are not the easiest batteries to work with as they have a strong tendency to catch fire if mistreated, and they are rather expensive as can be seen here: 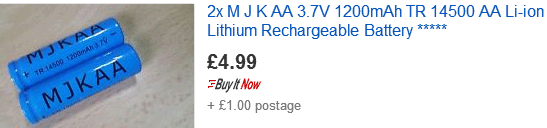 An alternative which might be considered is using Nickel-Manganese batteries which are the same size but only 1.2 volts each, so we would use three NiMh batteries instead of one lithium ion battery. However, the NiMh batteries can have a much greater capacity of 2850 mAHr and they are fully stable although when fully charged they should not be over-charged at more than 10% of the mAHr rated value as the battery life will be reduced if that is done. However, some of these small NiMh batteries do not live up to the maker’s claims and so you need to run a load test on any particular make of battery which you may consider using. For example, here are six different types of these batteries tested in groups of four, with a load of about 50 milliamps at five volts. The same load was used to test each of these batteries: 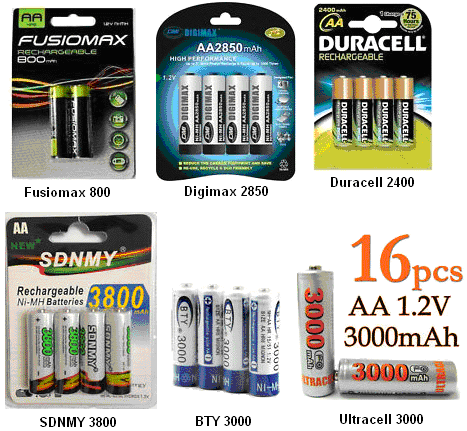 The results were most revealing: 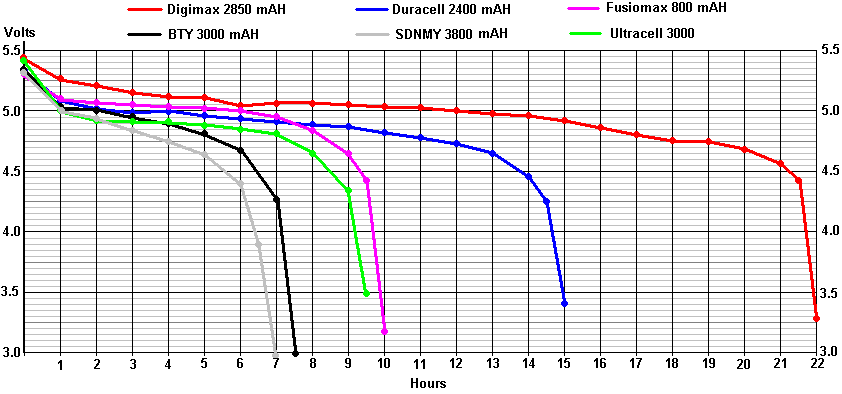 The BTY 3000 batteries do not actually claim on the battery to be 3000 mAHr (although the sellers do) and so, the “3000” could just be a trading name. The tests results for the BTY 3000 were so staggeringly poor that the test was repeated three times with longer recharging time for each test, and the one shown above is the ‘best’ result. You will notice how far short it falls when compared to the low-cost Fusiomax 800 mAHr batteries. The terrible performance of the BTY 3000 batteries is only exceeded by the incredible “SDNMY 3800 mAHr” batteries which show almost negligible capacity in spite of their amazing claims of 3800 mAHr. Consequently, I would suggest replacing one 3.7V lithium-ion battery with three Digimax 2850 batteries in a box like this: 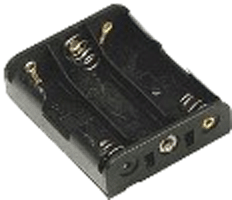 A battery pack like this will charge up to 4 volts and so would be a good substitute for lithium-ion batteries as one of those is required to drive the USB board which is used to charge a mobile phone. The USB board is small and low cost as can be seen here:  The USB board is small and low cost as can be seen here: 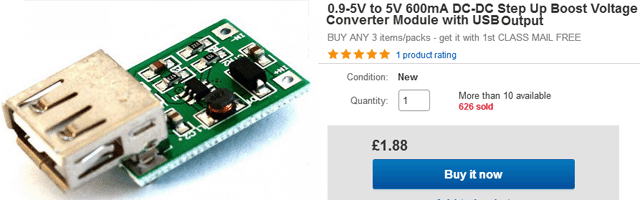 The input to this DC-DC converter board is supposed to be in the range 0.9 volts to 5.0 volts, so the 4 volts of the NiMh battery pack should be very suitable. Suitable magnets are available on eBay: 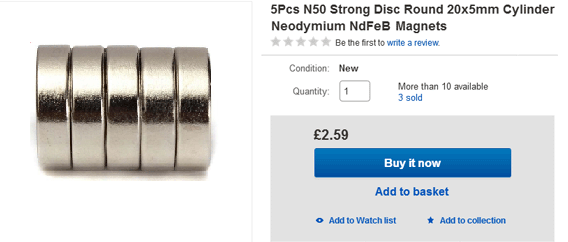 The coils can be wound easily by hand as enamelled copper wire is supplied in 50 gram reels and that makes it easy to wind one coil from two of those reels placed side by side on a fixed bar. We can make up coil spools quite easily if we use a power drill and a hole saw set like this: 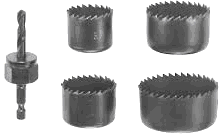 These saw sets normally have a saw which has an inner diameter of 35 mm. A small sheet of 3 mm thick Medium Density Fibreboard (“MDF”) can easily be drilled using the hole saw, and each drilling produces one perfectly round disc with an exactly centred hole in the middle. Two of those can be glued (at exact right angles to the central shaft) on to a tube to form a spool of the size wanted. If it is available, plastic sheet could be used instead of the MDF. Plastic tube of 8 mm diameter and an inner diameter of 6 mm is often available on eBay, but failing that, it is actually quite easy to drill a 6 mm hole through a short length, say, a 30 mm length of 8 mm diameter dowel rod. The piece of dowel is held in a vise and because it is easy to see, drilling a reasonable hole down the length of dowel is not actually that difficult. The spool can be clamped on to a standard 6 mm diameter threaded rod using two washers and two nuts or wing nuts 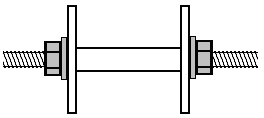 Then the threaded rod can be clamped at one end with a simple crank handle formed out of a small piece of timber, a clamping screw to grip the rod and a 20 mm length of drilled dowel on a screw to form the rotating winding handle:  A simple drilled hole in the vertical sides works perfectly well as a bearing, but keep the length “A” short as that needs less wrist movement and with it short, it is quite easy to turn the handle four times per second. A plank around 600 mm long makes a good base for the winder: 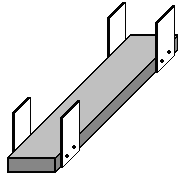 The winding handle part is at the near end and the two 50 gram spools of wire are placed side by side on a rod or dowel at the far end. The longer the plank, the easier it is to draw wire from the supplying spools as the angle between those spools and the spool being wound is smaller. The supplying spools are each just mounted on a dowel pushed through holes in the side pieces. Be sure to make those dowels horizontal so that the spools don’t keep moving to one side or the other. 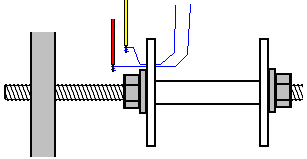 To start winding a coil, drill a very small hole in the left hand flange, just outside the washer. Thread the two wires through the hole and wind each a few times around the bared end of a short length of plastic covered wire, and join each wire to the copper winding wire by soldering it. This only takes a moment and if you have never soldered, it is very easy to learn and easy to do. Next, use a piece of duct tape to attach the thin wires firmly against the outer face of the flange of the coil spool and wrap the spare plastic covered wires around the threaded rod a few times so that they won’t catch on anything when being whirled around. Trim the duct tape so that it is all on the outside of the flange and so will not get in the way of the wire which is being wound on to the coil spool. The coil is wound by gathering the two strands in your left hand and turning the crank handle with your right hand. If you wish, you can clamp the winder to the table or workbench which you are using. The preferred way of winding is to turn the crank handle so the that wire entering the coil spool feeds on to the underside of the spool. That method of winding is called “Counter-Clockwise”. If you want a clockwise wound coil, you just turn the crank handle in the opposite direction so that the wire enters the spool at the top. Counter-Clockwise is considered to be the better way to wind these coils. When starting to wind, guide the wires close to the drilled flange. This is to keep the starting wire taught, flat and out of the way of the following turns. As winding continues, the wires are directed very slowly to the right until the spool shaft is fully covered. Then the wires are directed very slowly to the left for the next layer, and that is continued, right, left, right, left until the coil is completed. Then the two wires are duct taped to the plank so that they are kept controlled while you are busy with other things. Then the wires are cut, a few turns taken around the stripped end of a short length of thicker wire and soldered to make an electrical and mechanical join between the thick wire and the thin wire. The body of the coil is now wound with electrical tape so that none of the wire is visible, and then the duct tape is removed from the spool and the two starting soldered joints are epoxied to the flange. There is no need to mark the wires as the start of the wires are the ends coming through the drilled hole and the ends of the wires just stick out from under the electrical tape, and a meter will tell you which start and which finish are the same wire. You need to check that anyway to ensure that the wire connections are good and that the resistance of each of the two wires in the coil is exactly the same. It is not at all difficult to wind these coils, but it will take a few days. For people living in the UK, the best supplier is the Scientific Wire Company who manufactures the wire. In June 2017 they sell 50 gram reels of SWG 36 wire (their Ref: SX0190-050) for £3.10 including tax here and that is ‘solderable’ enamel which just burns away when you solder to it, which is enormously helpful, especially with very thin wire. An alternative supplier is ESR.co.uk which also offers 50 gram reels of 36 swg wire. The big advantage of these small reels is that you can just wind the entire contents of two reels of the wire to make the needed bi-filar coil without having to count the turns, and that is very convenient. The motor is a 5V fan with the fan blades glued to the yellow float and positioned very carefully to get it exactly centred over the shaft of the fan. The maximum current draw for the motor is 360 milliamps but as Denis is running it on 3.7 volts or less, the actual current draw is very small indeed. The underside of the fan looks like this:  This particular fan is available on eBay:  Denis invites you to build this generator circuit yourself, but If Denis will find some funds to produce the coils in big quantity and get the components he will be happy to offer the generators for sale to the public. Denis can be contacted via his YouTube channel by posting a reply on any of his videos and he will respond to you. His channel is here. Patrick Kelly http://www.free-energy-info.tuks.nl http://www.free-energy-info.com http://www.free-energy-info.co.uk http://www.free-energy-devices.com engpjk (at) gmail (dot) com |